So there I was preparing a presentation with some pretty pictures and then I thought…after I give this presentation: How will the audience play with the data and see for themselves how these pictures were brought into existence?
Finally I had a nice use-case to play around with some kind of environment to rapidly prototype data visualization in a manner that allows for repeatable further exploration and analyses, hopefully with the ability to draw some kind of conclusion. For now I settled to just learn the basics and get used to all these nifty tools that really make these types of jobs a breeze. You can skip this post and directly go the jupyter notebook if you just want to dive into the data/visualizations. The rest of the blog post is about the choices made and technologies used, mostly intended as a future reference for myself.
Apparantly sometimes you only grasp it when it really is in your face, even though you are continuously surrounded by it. The following tweet, made me realize that real consequences to vulnerabilities matter a lot! Oh and this blog is mostly some ponderings and opinions, for the people wondering if they should read it or not :)
🌐Lockbit #Ransomware paid the first $50K Bug bounty 💸
It was possible to decrypt any VMDK/VHDX file that was encrypted by Lockbit. So they got inside information related to some FBI agents, they were able to find out about the weakness in encryption and fixed it#Lockbitpic.twitter.com/9GrS97CCJf
Announcement that the first bounty was paid by a ransomware group (Lockbit) for a bug in their encryption implementation
What this tweet made me realize is that for Lockbit the consequence of the bug is directly tied to their income. No indirect damages, no additional bugs, no excuses. If the bug isn’t fixed people don’t need to pay them. How many type of companies and bugs do we know that have the same 1-to-1 relation between the bug and the direct consequence to survival?
This made me wonder if we are approaching the rating & fixing of vulnerabilities within regular companies in a less than optimal manner? Would be interesting if we could learn something from groups that operate on continuous innovation and the severe threat of real life consequences like jail time or worse. In this blog I’ll talk about:
Analysing the Lockbit bug bounty
Applying the lessons learned to regular companies
TL;DR Bloodhound showed us that graphs are powerful for the analysis and elimination towards domain admin privileges. The same concept should be applied to vulnerablities company wide. Regular companies don’t have the same severe consequences that ransomware groups have, should they?
In one of my last blogs I talked about visualizing firewall data for the purpose of analyzing the configuration and potentially identify security issues. As usual you can skip directly to the tool on my github, or keep on reading.
I wanted to continue playing with this approach to see how it could be improved from a fairly static tool, to a more graph database like approach. However, it turns out that it is somewhat difficult to obtain public firewall configuration files to play with. This is a similar problem to people doing machine learning in cybersecurity where obtaining datasets is still a bit of a challenge.
I decided to write a tool to generate this connection information and at the same time play as well as learn some things which I usually never bother with during development of proof-of-concept projects. So this time I decided to actually document my code, use type annotation and type hints as well as write some unit tests using pytest and actually figure out how argparse sub-commands work.
The tool intends to eventually offer the following options, but for now it only offers the plain option:
python generator_cli.py
usage: generator_cli.py [-h] [--debug] [--verbose] [--config CONFIG] [--mode {inner,outer,all}] {plain,time,apps,full} ...

Generate network connection with a varying level of metadata

options:
  -h, --help            show this help message and exit
  --debug               set debug level
  --verbose             set informational level
  --config CONFIG       Configuration file
  --mode {inner,outer,all}
                        Generate only inner vlan, outer vlan or all connections

Available sub-commands:
  {plain,time,apps,full}
                        Generate connection dataset with different levels of metadata
    plain               Only ip,src,ports
    time                Adds timestamp within desired range
    apps                Adds application details per connection
    full                Generates connections with timestamps & application information

Thanks for giving this a try! --DiabloHorn
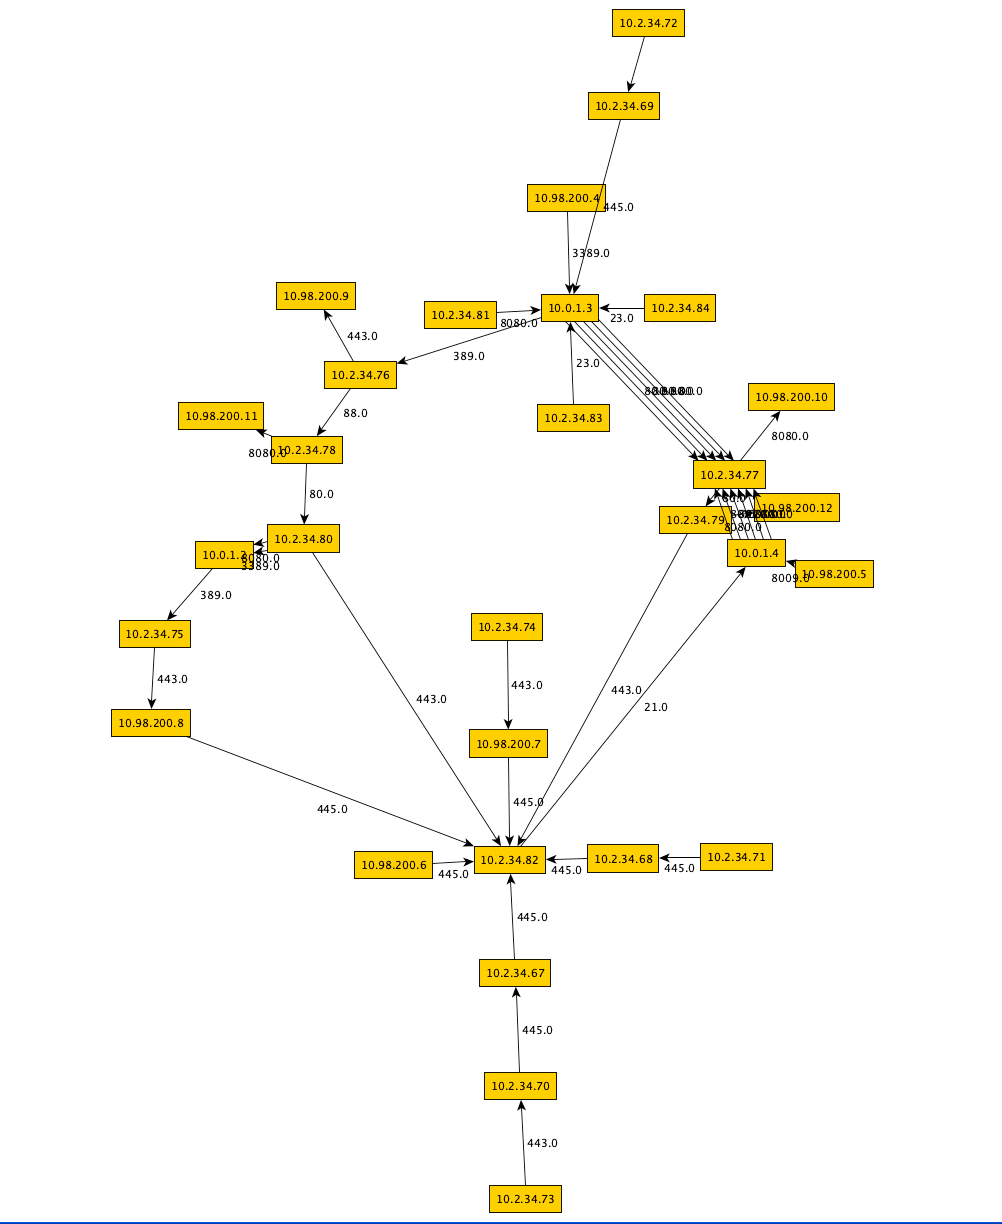
The plain option generates the bare minimum of connection information:
The main concept of the tool is that you can define VLAN names and some options and based on that information inner and outer connections for those VLANs are then generated. The --mode parameter controls which type of connections it will generate. The inner mode will only generate connections within the VLAN, the outer mode will generate only connections from the VLAN to other VLANs and the all mode will generate both.
I hope, but don’t promise, to eventually implement the other subcommands time for the generation of connection info within a defined time range (each connection being timestamped) and apps to generate connection info linked to applications like chrome, spotify, etc.
The following set of commands illustrate how you can use this tool to generate pretty pictures with yED
Please note: This is a mirrored post from a blog I wrote for one of my employers. The goal is to avoid the content being lost, since corporate websites are restructured and changed frequently.
Keyboard attacks, disk attacks and network attacks
Hacking ATMs, also known as Jackpotting, is an activity that speaks to our imagination, conjuring up visions of ATMs that spit out money into the street for everyone to pick up. The three attacks that we describe in this article are the result and recurring theme of numerous assessments that we have performed over the years for many of our customers. These are the (digital) attacks that we believe matter most and that require a serious look from anyone protecting an ATM.
Please note that hacking of ATM’s is an illegal action. Fox-IT’s security experts have performed these attacks with the permission of the ATM’s owners.
Recently I came across a tweet by @CristiVlad25 asking about what you should write in a pentest report, when there are no findings? I did a quick quote tweet with the first thoughts that came to mind:
State what what the good things were so that customers learn why they were good and to focus on reproducing that approach.
Also inform on context and explain if time constrained had an impact or not.
Which got me thinking, why not write a bit more about this situation? There are multiple resources on writing pentest reports that all highlight different aspects of the general structure and approach of a pentest report, so I won’t get into that, you can find multiple references, including sample reports at the end of this blog post.
Instead I want to only focus on the situation that you have 0, zero, nothing, nil findings. What do you do then?
Sometimes you are asked to perform a firewall analysis to determine if the configuration can be improved upon to reduce the ability for an attacker to move laterally through the network or identify attack paths that have been missed due to the many firewall changes.
You can perform this analysis using many tools and approaches, ranging from manually reviewing every rule, to using an automated tool like nipper or my personal favourite using a graph based approach (also works for log data). The reference section of this post contains papers that go in-depth on this approach.
With the graph based approach you can visualize the ruleset to identify nodes that have a lot of incoming and/or outgoing connections, but you can also trace paths through the network to understand if they should be removed. When combined with bloodhound data and neo4j you can query the data and have the graph database answer questions like “Is there a path from the workstation to the finance server?”. This requires some fair amount of knowledge, as well as supporting software to get it all setup, which in turn complicates the transfer of knowledge to network engineer or firewall administrators to be able to perform these analysis themselves, for the sake of better understanding if their changes impacted the security of the network.
Bottom line for me with these type of analysis is: How can I transfer security knowledge in an easy and understandable manner, to the people that have to deal with maintaining the environment on a daily basis?
A nice and rainy sunday evening, at least from the perspective of the couch that I was on about 10 minutes ago. I have now gotten up and walked to my laptop to rant, rant about cyber and rant about the many excuses that companies use to not become more resilient against attacks. Funnily enough, those excuses have now become the excuses of the cyber people as well. This post won’t really solve anything, it will however allow me to refill my glass of wine and bring me a warm fuzzy feeling of having shared my opinion online, without any goal or intended audience.
If you just want to have a drink (non-alcohol included) and read some chaotic ranting, do continue. Hope you get at the very least a laugh out of it, since your pool of tears has probably dried up a long time ago if you work in cyber security. Oh and if you strongly disagree with this post or it gets you angry or frustrated, just remember that I wrote this to relax, enjoy some wine, rant and then on monday start all over again with attempting to make the reality in which I operate just a little bit more resilient, if possible.
Getting to know the cloud version of Binary Ninja by reversing the CSAW 2021 haystack challenge.
This is a quick post on our adventures with binary ninja and the haySTACK challenge from this year’s CSAW 2021. On a lost evening @donnymaasland & @nebukatnetsar were playing around and said: Well this looks fun, let’s try it out with Binary Ninja.
I had totally forgotten about Binary Ninja, but boy oh boy do I still like it! Not that I forgot because I use other tools, mostly I forgot because I hardly do technical stuff nowadays. If you are not familiar with it, it is a reversing tool / framework which has a rich API if you use the native client.
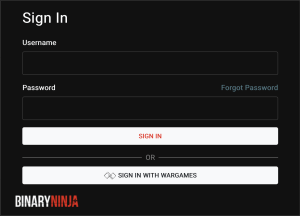
The binja cloud version
The nice part is that it also include what they call “High Level IL” which basically is a decompiler that shows you ASM converted to pretty readable C like representation. The even more awesome part is that collaborating on the same binary is a breeze. You can work with multiple people in the same binary without needing to setup anything yourself, just need to make sure everyone has an account on https://cloud.binary.ninja
Let’s get started with the challenge, or more specific getting to know the cloud version of Binary Ninja by playing around with this challenge. We’ll cover some things like:
If had the luxury of talking to my past self, these are things I whished I would have done differently during the years that I performed pentesting. Some of these I eventually learned before I finished pentesting, others well, let’s just say they are much more recent. If I think of more items I’ll attempt to update the blog.
If you are a pentester and you are reading this, I hope you can benefit from them. Just make sure you evaluate if they are applicable to your situation and adjust them as required. If you are in a rush, here is the list, details can be found in the rest of this article:
Don’t be afraid of talking to clients
Always ask for equivalent access
Avoid blackbox tests
Write the report while you pentest
Images, images & images
Provide detection advice & POCs
Provide reproducible POCs for your attacks (security regression tests)
Provide scripts to fix the issue (when possible)
Publish more
Grasp the bigger picture
Include what you didn’t do
Don’t be afraid to say something was good
I’ve also included some crazy fantasies of mine, which I’ll always be wondering if they would’ve made a difference.
Lately I’ve been shifting from offensive red team type of activities towards management and then towards blue team type of activities. During these transitions I’ve been more and more asking myself is infosec making a difference? I have to admit I got no clue what the answer to that question is, not even remotely. So I’ve decided to put my thoughts and ramblings into a blog post. Any particular reason? I’ve read multiple time that writing out thoughts, helps to organise them and also I just needed to orden my thoughts, maybe in doing so it will help me answer the question for my own specific context. If you continue reading you might experience a decent amount of emotions telling you ‘the guy that wrote this blog is WRONG!’, that’s ok. Feel free to correct me in the comments, it will aid me in finding new perspectives. I’ll try to stick to technical content next time ;)
In the previous blog post you could read about my experiment with using Microsoft Application Inspector as a tool to:
Scan a code base
Identify technology components
Visualize & determine risk
What we learned was that using a pretty coarse tool to establish a guesstimate of risk seems to be doable. We also learned that the output format lends itself very well to transfer knowledge about a code base.
But, how do we go from “seems doable” to “I’ve got a transferrable guesstimate on code risk”? My first idea was to just continue with merging the previous kibana visualizations into a nice interactive one and be done.
After some playing around I noticed that it wasn’t that easy! Further experimentation revealed, that the main reason I was struggling to visualize risk is the fact that I had no clue what I really meant by ‘code risk’. Sure, I know how to spot vulnerabilities in code and reason about it, but is that really a risk? I asked other pentesters and it was interesting that finding the vuln was easy, defining the risk was not. For example, a code base with clearly observable vulnerabilities is often viewed as a risk. What if those vulnerabilities are fixed, just enough, do we then still consider that the risk is present? If you are wondering what ‘just enough’ means, here is an example:
Vulnerability: SQL injection in ID parameter of an URL Root cause: Untrusted user input used in a non-parametrized SQL query Fix: Regex to only allow numbers
So, would this after implementing the fix: a) Be a vulnerability? b) Could we consider this a risk? I think that at the very least the query should also be rewritten to be parametrized. Why do we still hammer on changing the code if the vulnerability has been fixed? Because, speaking for myself, the used function or implementation of the functionality is flawed by design. So even if the exploitable vulnerability has been fixed, I still consider this risky code.
Yes, you could argue that it is the use of the function and not the function itselfthat carries the risk. For this blog and the purpose of this experiment, I’m not going to dive into those semantics.
For now, let’s dive a bit deeper into understanding risk then defining risk and hopefully visualizing risk in an interactive manner. The transferrable aspect is, of course, the fact that the knowledge is bundled into easy and structured file formats. The github for the POC files can be found here.
The benefits of being exposed to new subjects are that you tinker with them and start experimenting. Hopefully, this blog leads to some new ideas or at best revisits some established ideas and attempt to show that a less perfect approach might just work. Also keep in mind I’m by no means an expert in advanced automatic code / data flow analysis.
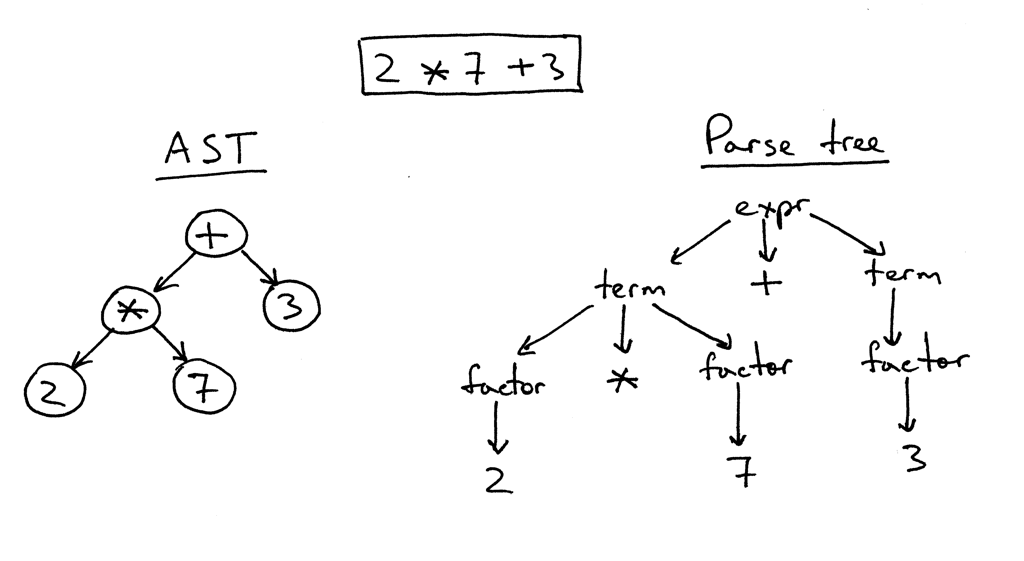
So at my current company, one of our units is doing some pretty cool work with ensuring that security operates at agile speeds, instead of being slow and blocking. One of their areas of focus is the automation of code reviews augmented with human expertise. One of my former colleagues Remco and I got chatting about the subject and he brought me up to speed on the subject. The promising developments in this area (as far as I understood it) concerns the ability to grasp, understand, process the language structure (AST), but also the ability to follow code flows, data types and values and of course lately the practical application of machine learning to these subjects. In a way mimicking how code-reviewers go through code, but using data flow techniques to for example track untrusted (external) input.
What is it good for? That was my first question. Turns out that if you have the above-described ability, you can more easily and precisely spot potential security flaws in an automated manner. It also enables you to create repeatable queries that enable you to quickly weed out security vulnerabilities and detect them if they or variants somehow creep back into the source.
Because just as with regular ‘user security awareness’, an automated and fool-proof process will beat ‘awareness’ every time. Having security aware developers is not bad, but having automated processes and process-failure detection is even better.
However, the above is pretty complex, so I decided to tinker with a less optimal and perfect solution and see what I could do with it. My main goal was to achieve the following:
Enable a guesstimate on what part of a code base could be considered ‘risky’ security wise. Capture the code reviewers knowledge and improve the guesstimate of ‘risky’ parts of a code base.
The above would result in an improved ability to process codebases according to a more risk-based approach, without continuously needing expensive experts. It would however not be fully precise, generation of false positives. The lack of precision I accept in return for the ability to at least have a guesstimate on where to spend focus and effort.
If you are still interested, keep on reading. Just don’t forget that I’m a big fan of: better to progress a bit than no progress at all.
Like many people, due to recent events, I’ve had more time to reflect on myself and on some of my mistakes. I’ve always been a fan of sharing knowledge, that includes failures and the things you learn from them. So here is one of those failure from which upon self reflecting I’ve learned to change that behavior.
Sometimes you already knew something was true, but you just kept lying to yourself. This is even worse when you have recommended other people to do what you still refuse to do yourself, because you keep lying to yourself. The recommendation is good, the part where you don’t follow your own recommendation, that’s where it all goes down the drain. If you are wondering what I’m talking about, I’m talking about:
Doing all kinds of tasks manually, because in that precise moment it was the ‘quick’ option
The above is what I’ve been doing for the last couple of years, mainly because during my day job my work is less technical. This is the wrong approach, even if I told myself otherwise. The interesting part is that during this time I coached and advised people around me to:
stick to (further) learning programming languages
Learn devops
Take the time to automate and learn how to automate
Don’t worry about being slow now, it will pay off
So why then, did I not follow my own advise? Because besides the reason of it being quicker to do manually, I also told myself that by doing it manually it would be easier to retain technical knowledge.
Now this blog has turned up two fallacies:
Thinking that doing it manually is quicker
Thinking that by doing it manually you retain knowledge
Both of them are incorrect, that much is obvious, but why?
The first one is incorrect because the moments that warrant that ‘quickness’ in that precise moment are not as many as you’ve been telling yourself. My experience is that in a lot of cases it was perfectly fine to grab a couple of hours or a day or two to automate it. I actually experienced this, since other people with the exact same problem took the advise and automated it. They could later indeed benefit from their work and the more often that they automated tasks, the faster they could do it.
The second one is incorrect, because in a sense you are training yourself to:
Re-learn the same knowledge over and over again
Instead of learning something, documenting it and being able to go back to it. You are learning something, doing it by hand and then forgetting it. Yes you might retain some of it, but eventually it will fade. So if you need to do it again, you need to re-learn it again instead of referencing it and building upon your previous knowledge. I knew this all along, since I often went back to older scripts and code I wrote. I just never took the time to keep doing that when my day job diminished the amount of time I spent on technical problems. Somehow the reward of doing something fast in that precise moment, was bigger than automating it and reaping the benefits. The illusions and tricks the mind plays on you are truly magical.
To get myself going again, I decided to automate a thing I’ve been doing manually for the last couple of years, which is configuring a newly installed Ubuntu VM. The ansible setup is not perfect, but at least I’ve begun to automate it:
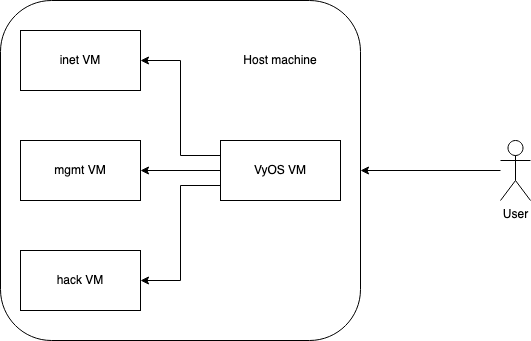
Sometimes projects are just born out of pure frustration, this is one of those projects. I’ve probably build like a dozen VyOS configurations to virtually isolate networks and virtual machines on my host. I briefly touched upon this subject a couple of years ago when I wrote about stashing ESXi inside VMware workstation to achive a portable lab. Since then I’ve build multiple versions, to either ensure that Red Team operations and regular penetration tests are able to contain the breach to a single virtual machine or to enable training networks with multiple networks and clients. If we visualize a simple setup it looks like this:
This compartmentalizes potential breaches to their own segment. In this case each segment has a single VM, but it could contain multiple VMs. Yes, the virtualization layer becomes a single point of failure. I still think it adds value from most attacks that you could suffer. Including the usual surfing the internet and getting pwned one.
So here is a repo which contains the instructions and example config file to get you (read: most probably future me) started. The current setup ensures that you have one mgmt segment and one internet only segment. That means, you can manage your VyOS from the mgmt segment if you place a VM in it. You can browse the internet and nothing else if you place a VM in the internet only segment.
Whenever I build more segments that lend themselves to be of generic use I’ll update the repo. Feel free to send pull requests with either alternative configurations or improvements and segment expansion on the current one. @donnymaasland, already had a sneak preview and submitted some improvements. You can view the historical commits to review the improvements as well as some personal preferences on rules.
On and yes, I do agree that Qubes OS is a superior solution, however this is more versatile. Also this does not have the same threat model that Qubes OS has. For those wondering about the threat model for this, here is a quick summary of it / the intended features:
Contain regular breaches to a single segment
Protect against regular attacks
Not intended to withstand targeted or advanced attacks
Avoid user mistakes by enforcing network ACLs from a central system
Improve ease of use by just requiring users to place VMs in the right segment
Aid Red Team / Pentest to not fuckup when they have to use specific exit IP addresses
I’ve had some interesting conversations on the topic of performing social engineering attacks via email and decided to share some of my past lessons learned. The focus will not be so much on the technical side as it will be much more focused on the social aspect. Although much of today’s written social engineering attacks are carried out using email, there are other written communication methods which can and should be used depending on your objectives.
The social aspect for me concerns the journey from the moment the victim receives the email until the moment that your objective is achieved. Whereby the objective often relates to infecting the victim it could also involve having the victim send you some documents or perform other actions. The victim’s social journey is something that can be influenced, but in my experience it is not something that you’ll fully control.
When I started out with attacking organizations and individuals I was often under the impression that everything should work on the first try. This of course is not true. What is true, is that you should assume failure and put some thought and effort into the consequences. One of the more important lessons I learned early on in regards to performing social engineering via written media is:
It really doesn’t matter, nobody cares.
Have you ever looked at your own communication? have you ever worked in a SOC or followed up on incidents? Eventually most companies as well as victims are pretty tired of the endless stream of shit that they receive on a daily basis. So yes, there will be investigations, they might even follow-up on your attack, but then what? It’s not like they can block all senders or block the entire internet or forbid their employees from working and talking to potential customers, partners, vendors right? So yeah, you guessed it right, if you mess up:
You get to try it again, and again and again…
Of course there are some exceptions like when you really mess up and they figure out you’ve been hired to attack them or if you technically have a ‘tell’ which would enable them to block all incoming attacks pretty quickly. Although…how would they block you across all possible communication channels that their employees use?
Anyhow I’m getting ahead of myself, let’s talk about some war stories and I hope you learn as much as I did from them. As usual I garbled up a lot of information, timelines and other details to attempt some anonymization. Oh and yes, the technical part of these attacks eventually matters, specially if you have to get some code execution, but with the proper social engineering context this can sometimes become much, much easier to perform.